General programming utils
Tcode begins by introducing some generic commands for use in TeX.
\let\exP=\expandafter
\def\expandonce#1{\unexpanded\expandafter{#1}} %#1 must be a single token
\def\letcs#1#2{\exP\let\exP#1\csname #2\endcsname}
\unless\ifdefined\@gobble \def\@gobble#1{}\fi
\unless\ifdefined\quitvmode \let\quitvmode\leavevmode\fi
plus two others and three constants that will be considered later.
\exP is just a shortcut for \expandafter. This command is used so much that the code
becomes much more readable with \exP instead of \expandafter (in retrospect, it is
clear that \expandafter should have had a much shorter name). If you really want \exP to
mean something different, you cannot use Tcode. \expandonce needs no further explanation.
\letcs lets its first argument equal to the \csname of the second one. For example,
\def\foo{tion}\letcs\next{func\foo} is equivalent
to \let\next\function.
\@gobble is given the usual definition of this macro (e.g., in Latex). Finally, \quitvmode,
a primitive in Luatex, is made equal to \leavevmode if it doesn't exist.
The two other commands are related to primitives available in Luatex:
\ifdefined\begincsname \let\condCsname\begincsname
\else \let\condCsname\csname
\fi
%Use with care
\def\letcsrelax#1#2{\exP\let\exP#1\condCsname #2\endcsname\relax}
\condCsname is to be used when one wants to use Luatex's \begincsname
but wants to write code that does not need Luatex. If that primitive is not available \condCsname
will be simply \csname.
The macro \letcsrelax is to let a control sequence equal to the \csname of its second
argument while avoiding the creation of an entry in TeX's hash, provided we are using Luatex, while also avoiding building
the csname twice. If the underlying engine is not Luatex or
if the control sequence built by means of \csname already exists, the expansion of \letcsrelax
will place a \relax after the assignment. For example, if \FormatFunction is defined, the
final expansion of \letcsrelax\temp{FormatFunction} will be
\let\temp\FormatFunc \relax
If \FormatFunction is not defined, the expansion will be the same
in non-Luatex, while in Luatex it will be
\let\temp\relax
The constants introduced are
\newcount\cat@xii \cat@xii=12
\newcount\cat@xi \cat@xi=11
\ifx\@m\undefined \mathchardef\@m=1000 \fi %Latex's definition
The first two ones are intended to be used for the respective numbers in assignments
of catcodes. Unlike for the constant 1000, there are no standard tokens standing for the numbers 12 or 11.
Inline environments
Summary of environments
Tcode defines several environments for typesetting inline code:
\Ncode \n(s)code \F(ormat)code \f(ormat)code \ident \IDENT \FastIdent \Fastfid
In this list, \n(s)code means that there is one environment named \ncode and another one
named \nscode, and that they are very similar. Likewise for \F(ormat)code
and \f(ormat)code. Most of
them are not intended for the end user, who need only know about \ncode. He may also know \Ncode
and \ident, but it is not strictly necessary.
The environments differ mainly on whether they rescan their argument with \scantokens
and on whether they invoke \PrePrintHook. Here is a table displaying the most
important features of each environment:
| Takes the
format in #1 | Catcode
setting | Hook on entry | \scantokens | Invokes
\PrePrintHook |
|---|
| \Ncode | | Ncode | \LongNcodeHook | | †
|
| \n(s)code | | Ncode | \LongNcodeHook | † | †
|
| \ident | | Ident | \ShortNcodeHook | † | †
|
| \IDENT | | Ident | \ShortNcodeHook | † |
|
| \f(ormat)code | † | Fcode | \ShortNcodeHook | † | †
|
| \F(ormat)code | † | Fcode | \ShortNcodeHook | | †
|
| \FastIdent | | Ident | \ShortNcodeHook | |
|
| \Fastfid | † | Ident | \ShortNcodeHook | |
|
\scantokens
In order to correctly parse the code to be typeset the environments redefine the catcodes before reading
their argument. The definition of \Ncode, for example, is as follows:
{⟨some tasks⟩\SetNcodeCatcodes\the\LongNcodeHook\N@code}
\def\N@code#1{...}
Thus, \Ncode does not consume its argument. Rather, it first changes the catcodes, then
invokes \N@code, which is the one actually reading the argument. This way the argument is
read with the modified catcodes:
\Ncode{a && b}
In the above example the & signs are read with category 12; i.e.,
normal non-letter.
This approach will fail if the \Ncode environment is read as part of the argument to
another macro, as in
\title{The \Ncode{&&} operator}
This is a known limitation of TeX, and in pure TeX there is almost nothing that can be done
about it. As a result, some macros cannot be used in the argument to other macros, the best known
example being Latex's \verb for typesetting text verbatim.
eTeX introduced \scantokens to overcome this limitation. It mimics the
process of writing its argument to a file thence reading it back. The effect of this is to convert
the tokens into characters, then retokenize the characters again, with the catcodes currently
in force, that are possibly different from the ones used when the characters were converted
into a token list in the first place. \ncode and all the macros that have †
in the \scantokens column in the table above take advantage of this macro.
For example, the definition of \ncode is
{⟨some tasks⟩\SetncodeCatcodes\the\LongNcodeHook\n@code}
\def\n@code#1{\exP\@parsecode\scantokens{#1\end}⟨some tasks⟩}
You may ignore \exP\@parsecode and \end for the time being.
eTeX went a bit overboard in imitating the writing and reading back of its argument. This
process is what programmers used to do before \scantokens existed (and many
continue to do so nowadays). Thus, \scantokens places an \endlinechar
at the end of its argument and further the contents of \everyeof, which nobody
wants there. Therefore, if you look at the actual definition of \n@code you will
see that it is
{\endlinechar=-1\everyeof={}\exP\@parsecode\scantokens{#1\end}⟨some tasks⟩}
Luatex fixed this and called the new macro \scantextokens. Therefore, if
this macro is available, the package uses it
\ifdefined\scantextokens
\def\n@code#1\exP\@parsecode\scantextokens{#1\end}\spacefactor=1000\egroup}
\else
\def\n@code#1{\endlinechar=-1\everyeof={}\exP\@parsecode\scantokens{#1\end} ... }
\fi
Both \scantokens and \scantextokens duplicate # signs.
If the environments do not appear as part of the argument to another macro this causes no problem,
because by the time they are read they already have the catcode 12. If you have those signs
inside an environment that is itself part of a macro argument, you should use \#:
\subsection{The \ncode{\#} operator}
The solution to this problem in the code would be to leave the category code of # unchanged
and replace any ## seen in the input, after \scantokens has been applied,
by a single one. But that would complicate the code of the environments considerably, unjustified by
the extremely few instances that need it, and by the easy solution of writing \# in those cases.
\scantokens will place an extra space after each multiletter control sequence.
See Spaces below.
Catcode settings
All the environments begin by setting catcodes. Some of these settings are introduced in hooks intended for the language package
layer. The hook on entry comes later, so that the final user or package writers can override it. There are three different settings.
The catcode changes take place before reading the argument, so { and } cannot be changed,
otherwise the argument to the macro would not be recognised. Inline code typically does not include many braces.
If this is not your case and you want braces to be printed, you will need to redefine \n@code. In any case
braces can be printed by writing \{ and \}.
Environments that expect a single identifier just need the characters in its argument not to cause problems
(in particular, within \csname). Therefore, only those special to TeX and that can appear in
an identifier need to be changed. This setting is stored in \SpecialCharsInIdent. Its default definition is
\def\SpecialCharsInIdent{\catcode`\_= 11}
Here and in the rest of this manual, the numbers 11, 12, 13 and -1
will be displayed literally for the sake of readability. The actual definitions in the kernel place instead \cat@xi,
\cat@xii, \active and \m@ne, respectively, except in a few places.
The environments \F(ormat)code and
\f(ormat)code can take anything as argument but they don't
break it in parts. Therefore, they too only need special characters not to cause problems. But { and }
cannot be changed because they are needed for delimiting the argument itself as explained above. The definition for this is
\def\SetFcodeCatcodes{
\catcode`\ =13 \catcode`\_=12\catcode`\#=12 \catcode`\$=12
\catcode`\&=12 \catcode`\^=12\catcode`\~=12 \catcode`\%=12
\SetEscapeChars \chardef\\=`\\
}
except that \f(ormat)code sets space back
to normal space. The third line sets up common escape sequences. It is unlikely that a language package needs to change this command.
(It may want to redefine \SetEscapeChars, but not this command).
Finally, the long environments: \Ncode, \ncode and \nscode, break up their argument in words.
To this end they need not only the definitions in \SetFcodeCatcodes, but in addition set to letters (category 11)
those that can appear in an identifier, whether special or not. Therefore the catcode setting for these macros sets digits as letters, as most
languages allow digits within an identifier, and further includes
\SpecialCharsInIdent\OtherCharsInIdent
We have already seen \SpecialCharsInIdent. The default definition for \OtherCharsInIdent
is {}; i.e., empty. Language packages should include here non-special (to TeX) characters that should be recognised as letters
by the environments. For example, \def\OtherCharsInIdent{\catcode`@=11 }.
If arbitrary non-ascii letters are allowed, the language package should use catcode tables for this (available in Luatex).
\FastIdent and \Fastfid
These are the simplest macros. They are used as follows:
\FastIdent{int} \Fastfid{\FormatKeyword}{int}
The first one guesses the format to apply from its argument. In the example
above it will apply, say, \Format@int (the other possibility is a macro name like this except
for a language infix, in case a language has been declared and is in force). If this command is undefined it will be ignored. The second
one gets the format to apply as its first argument. In the example above, \FormatKeyword.
The ‘f ’ in its name stands for “formatted”. The definition of these
macros is as follows:
\protected\def\FastIdent{\bgroup\SetIdentCatcodes\the\ShortNcodeHook\FastIdent@}
\protected\def\Fastfid#1{\bgroup\SetIdentCatcodes\the\ShortNcodeHook\Fastfid@{#1}}
\def\FastIdent@#1{\condCsname Format\TcodeLang @#1\endcsname #1\egroup}
\def\Fastfid@#1#2{#1#2\egroup}
\SetIdentCatcodes, as its name implies, sets the catcodes. To this end it uses \SpecialCharsInIdent.
Then the macros invoke the hook on entry, then consume its argument, formatting it. \TcodeLang is
where Tcode holds the active language; it expands to empty if no language has been declared (a language
package may, but need not, declare the language).
These macros are not intended for direct use in the running text, especially \Fastfid.
Having to manually supply the format to apply defeats the purpose of a macro that automatically
formats its argument. However, they are faster than any of the other macros and thus very
suitable to be used by code that creates code (e.g., that writes to a file to be later processed
by TeX). \Fastfid is the fastest of all. Both macros will fail if used in math mode,
or if used in the argument of another macro and the identifier to be formatted includes the
character _ or some other character problematic to TeX.
Although intended primarily for formatting a single identifier, they can be used to format
longer pieces of code, as long as the format to apply is the same for all of it. E.g.,
\Fastfid\FormatKeyword{unsigned int}
\Fastfid\FormatDeactivated{float x,y,z;}
\condCsname stands for \begincsname in Luatex and
for \csname otherwise.
These two macros get the format in #1, as \Fastfid. In contrast
to that macro, they can be used in math mode and avoid their argument being hyphenated when
that suppression is in effect (the default in Tcode), by placing their argument in an \hbox
if necessary. Further, they use \SetFcodeCatcodes instead of \SetIdentCatcodes,
thereby being adequate for typesetting arbitrary pieces of code, but still applying the same format
to all its argument.
\def\fcodeinit{\ifmmode\exP\hbox\fi\bgroup\SetFcodeCatcodes\MakeDefineFDollar}
\protected\def\formatcode#1{\fcodeinit\catcode`\ =10 \the\ShortNcodeHook\f@code#1}
\protected\def\Formatcode#1{\fcodeinit\the\ShortNcodeHook\F@code#1}
\def\f@code#1#2{#1{\scantokensfixed{#2}}\egroup}
\def\F@code#1#2{#1{#2}\egroup}
As can be seen in the definitions above, \formatcode rescans its argument with
\scan(tex)tokens while \Formatcode does not.
The braces surrounding the text to be printed have a double purpose: to enclose the text so that it can take
the place of the format's argument, if #1 needs to take the text to be formatted as argument,
and to stop a possible \ignorespaces popping up from #1 (\color
ends in \ignorespaces).
They are suitable for typesetting a piece of string as string, for example:
\Formatcode\FormatString{Unexpected identifier: ^^^^^ }
Though a final user is better oriented towards using \fcode and \Fcode (see below).
They are not needed for formatting a full string; \ncode will handle that properly:
\ncode{"Unexpected identifier: ^^^^^ "}
\fcode and \Fcode
These two macros are like \formatcode and \Formatcode but they take the format
as a word, as in
\fcode{String}{Unexpected identifier: \ \ ^^^^^ \ \ }
The \ are necessary because \fcode treats
spaces as normally in TeX. With \Fcode they would not be necessary (as can be seen in
the example using \Formatcode above).
These macros are preferred for the final user instead of \formatcode and \Formatcode,
because the latter require to know whether the command holding the format is \FormatString or,
say, \FormatpyString.
\ident and \IDENT
These are the most general macros that guess the format to apply from its argument. They are a slower
but more robust and, in the case of \ident, also more general variant of \FastIdent.
They are the user macros for
typesetting a single identifier; though a “normal” user need not know it and always
use \ncode instead. Both of them guess the format to apply from their argument and
both of them use \scantokens. The difference between the two is that \ident
calls the preprint hook (i.e., \PrePrintHook) and \IDENT does not.
There is another difference: \IDENT just applies the format from its argument:
\csname Format\TcodeLang @#1\endcsname. If this is not defined it will not apply any format
beyond the one specified in \ShortNcodeHook, if any. This is the same as all the previous
macros. \ident, by contrast, falls back to \FormatOtherWords if the
above format is not defined.
The idea is that \ident is the all-purpose macro for typesetting a single identifier,
while \IDENT and the others are provided for developers and have shorter definitions
and execute faster:
\protected\def\IDENT{\ifIdboxed\bgroup\SetIdentCatcodes\the\ShortNcodeHook\IDENT@}
\def\IDENT@#1{\condCsname Format@#1\endcsname{\scantokensfixed{#1}}\egroup}
\ifIdboxed places the \hbox if necessary: if we are in math mode or
if hyphenation within the code has been suppressed (the default). Then \scantokensfixed
stands for either \scantextokens, in Luatex, or for a fixed \scantokens otherwise.
\condCsname stands for either \begincsname or \csname.
\Ncode, \ncode and \nscode
These are the environments for inline code that can format arbitrary pieces of code. \Ncode
changes the catcodes, then parses its argument. It will fail if used as part of the argument of another
macro and the code includes some special characters, such as _ or &.
In order to avoid this, \ncode and \nscode use \scantokens
to rescan their argument. \ncode is otherwise identical to \Ncode.
\ncode: {\quitvmode\ifmmode\exP\hbox\fi\bgroup\SetncodeCatcodes\the\LongNcodeHook\n@code}
\Ncode: {\quitvmode\ifmmode\exP\hbox\fi\bgroup\SetNcodeCatcodes\the\LongNcodeHook\N@code}
\def\n@code#1{\exP\@parsecode\scantextokens{#1\end}\spacefactor=1000\egroup}
\def\N@code#1{\@parsecode #1\end\spacefactor=1000\egroup}
(The definition shown here for \ncode is that for Luatex, with \scantextokens).
First, the macros execute \quitvmode in case they are the first thing that appears
in a paragraph. In some combination of settings that would not be necessary, but it is easier and even
faster to just place \quitvmode unconditionally. Then an \hbox is placed
if the macro appears in math mode. Note that the \bgroup appears unconditionally,
so the corresponding \egroup will, too, whether it is closing an \hbox or not.
Then the catcodes are set, then the entry hook is executed, then the code is parsed.
\nscode is like \ncode but takes care of ignoring spaces that may
appear between itself and its argument, as in \nscode {float x;}. This may happen for
automatically generated code; users do not normally write a space between the macro and its argument.
\@parsecode is the macro that parses and formats the code. It is explained at
length below.
Hook on entry
All the environments invoke soon a hook that the consumer of the Tcode package can use to set up
whatever he wants. These hooks are not intended for the language layer but for further ones.
These hooks are token registers. Tcode's default is to select the typewriter font:
\TcodeHook={\SelectCodeFont}
\ifx\ttfamily\undefined
\let\SelectCodeFont=\tt
\else
\let\SelectCodeFont=\ttfamily
\fi
\ShortNcodeHook={\the\TcodeHook}
\LongNcodeHook={\the\TcodeHook}
By modifying \TcodeHook all hooks will get modified, as can be inferred from the
previous definitions. \ShortNcodeHook is for macros that apply a single format
to the whole argument. \LongNcodeHook is for the ones that parse their
argument and apply to each piece of it the corresponding format.
In addition to the two hooks shown, there are others for the display environments,
with the same default definition.
It is very common that the hook is used for selecting a font sidestepping the logic of the \ttfamily
command. For this reason the hook includes itself \SelectCodeFont as a hook, so that modifications
to this command are independent to other modifications of \TcodeHook. This is what the files
Tutils-fastfonts-1.tex and Tutils-fastfonts-2.tex
provided with Tcode do.
Escape sequences
Code often contains \t, \\ and other escape sequences. In TeX these
have to be typeset as \\t, etc., except that in order to produce \\ one should type
\backslash\backslash. This is very inconvenient when typing
code snippets. Therefore, all macros intended for typesetting general text (as opposed to a single word)
make \\ produce \.
As to the other escape sequences, they are activated by default in \F(ormat)code
and \f(ormat)code, and in the long inline environments (\Ncode and
\n(s)code), only for strings. The activated escapes are:
\t \n \" \' \0
Typing this in the code will output the same two characters as typed. \0 will only work
if the 0 is not immediately followed by other digits or by letters. Thus, users can write, for instance,
\ncode{"Usage:\n\t\"split\" <name> <args>"}
and they will get the output "Usage:\n\t\"split\" <name> <args>".
\F(ormat)code and \f(ormat)code
do not process their argument in any way, other than to apply the specified format to it. Therefore, these escape
sequences are either active or inactive for the whole environment, and it seems more useful to have them active
by default. On the contrary, the long inline environments make use of \@parsecode; therefore,
the escape sequences can be activated only for strings and string-like constructions.
There is seldom more than one string in an inline code snippet and often none at all, so deferring its activation
until a string is found is more efficient.
The display environments Code and stdout and stdin activate them
on entry to the environment. The first one may contain many strings within a code snippet, and while it
may also contain none, those escape sequences are useful also within comments. As for stdout and stdin,
the console often sees those sequences displayed on it (either typed by the user or output by some program).
A computer (or other) language not making uses of those escape sequences is unlikely to have
them in the snippets in the first place, so they don't harm. But if they do a language package can redefine
the commands
\SetEscapeChars and \SetnEscapeChars
that activate them.
\SetnEscapeChars is a variant of \SetEscapeChars that adds \ignorespaces
to the end of some of them, which is needed in \ncode in order to avoid one extra, spurious space. However,
you never need to invoke that control sequence if you want to activate the escapes when they are not active,
because \ncode lets \SetEscapeChars equal to \SetnEscapeChars within it.
Spaces
Printing or not
The handling of spaces is difficult in TeX because TeX itself handles them in a way different from
any other character. If the environments are not part of the argument to another macro, the package
Tcode has absolute control over them, but if the environment has been grabbed as part
of the argument to something preceding it there is no way to recover the original spaces, and the
best that can be done is to guess how they were.
\Ncode and \F(ormat)code perform no guess:
they print the spaces as they get them (but \ignorespaces still works).
\ncode prints spaces except the ones following a control sequence, even a single-character
one. Within « » and ‹ › spaces behave normally. (The display environment \Code does the same).
Within ' ', " " and any series of characters that the language package parses
subtracting them from the control of \@parsecode, \ncode will place an extra space after
each letter control-sequence (this is a defect of \scantokens). "\foo a" and
'\foo' would print two and one spaces respectively. This can be avoided by using
\ignorespaces at the end of the macro: \def\Foo{\foo\ignorespaces},
"\Foo a",'\Foo'. This is what Tcode.tex does
for \t, \n and \0. Symbol c.s., as \$, \*, etc.,
do not suffer from this problem. You typically don't write other kind of control sequences inside strings.
Another way of avoiding a space after a letter control sequence in ' ' and " ", is using, e.g.,
\let\*=\unskip
\ncode{'\foo\*a'} \ncode{"\foo\*"}
If you need \* occasionally, you can place \let\*=\unskip inside \LongNcodeHook.
The other environments, viz. \FastIdent, \Fastfid, \ident, \IDENT
and \f(ormat)code treat spaces normally. You typically
don't put spaces within those environments other than in \f(ormat)code,
and if you do they are likely just single spaces separating words.
Space stretchability
TeX places a wider space by default after certain characters: . , : ; ? ! This extra space is wrong for code typeset
with a fixed width per character. Fixed-width fonts should be designed without those extra spaces, but unfortunately
they often do not. The default fixed-width font in TeX, computer modern, does remove those wide spaces except
that it places exactly a double space after a full stop, which is not that bad. But even that is usually not desired by
typists of code.
One way to avoid this is typing the code with the so-called french spacing, which does not place those
extra spaces. This can be done by including \frenchspacing in the hook on entry for all the environments.
This is not a primitive, but expands to a series of assignments for TeX's internal parameters. This is annoying
for the inline environments that intend to be fast. It can be omitted from the environments intended to typeset
a single identifier, but it would remain in the others, particularly in \Formatcode.
The solution adopted by Tcode is that the extra stretchability is not his problem and should be fixed
in the font itself. There is an example of how to do this in fswitch_bera09.tex, to be found in
the “examples” folder.
If you want not or can not modify those parameters in your fonts, you may include \frenchspacing
in the entry hook. This is done in examplepy_plain and exampleC_latex:
\TcodeHook\exP{\the\TcodeHook\frenchspacing}
It would be better to include it, not in the overall hook, but in \LongNcodeHook,
\CodeHook and \StdioHook; i.e., in all of them except \ShortNcodeHook,
so that the fast, short, environments remain very fast.
Stretchability after the environment
Removing the wider spaces from the font solve the problem of wider spaces within the
environment. But consider the TeX code The declaration \ncode{int a;}
declares . . . You will get a wider space between the code
snippet and the word “declares”. Removing the extra space from the font does not change
the \sfcode's. The space that follows the environment will be typeset using the normal
font for text and will be stretched because it comes after a ; sign. In order to
avoid this the long inline environments end with
\spacefactor\@m
that sets the space factor to its normal value (\@m is a token for 1000).
If you include \frenchspacing in the hook on entry this last assignment becomes superfluous,
but it hardly takes TeX time to process it (all the more since the value 1000 often agrees with the previous value).
The macros \F(ormat)code and \f(ormat)code
may also include arbitrary text. But these are not intended for general use and, because all their argument
gets the same format, they are more unlikely to end in one of the special characters and at the same time
be followed by a space. If one instance of these produces an undesired extra space after it, just fix that
space as any other unwanted extra space after a ‘.’ in TeX.
\@parsecode
This is the macro responsible for parsing and formatting each word or other tokens in the code.
It is used by the long inline environments; i.e., \Ncode and \n(s)code,
and by the display environment Code. Its definition is as follows:
\def\@parsecode#1{
\ifcat\noexpand#1a% If #1 is a letter (incl. 0-9, _)
\WordOrNumber#1% Changes \parsecode
\else
\NcodeNoLetter #1% Sets \parsecode to \@parsecode or to something else
\fi
\parsecode
}
\def\WordOrNumber@kernel#1{
\let\parsecode\NcodeParseWord
\if#1\DollarChar \WordToPrint\exP{\activedollar}
\else \WordToPrint{#1}\condCsname @+#1\endcsname %If #1 is a number, \let\parsecode=\NcodeParseNumber
\fi
}
\let\WordOrNumber\WordOrNumber@kernel
\def\NcodeNoLetter#1{
\ifcsname NcodeNoLetter\TcodeLang @\string#1\endcsname
\letcs\parsecode{NcodeNoLetter\TcodeLang @\string#1}
\else
\let\parsecode\@parsecode
\MaybeSkipSpacesAfterCS #1
\fi
}
#1 is the next character in the input stream. For example, if you type \ncode{orig + off},
the first execution of \@parsecode will get o (the o from orig) as #1.
If #1 is a letter or a number, the macro will call another macro for parsing it (either \NcodeParseWord
or \NcodeParseNumber); otherwise, it will invoke \NcodeNoLetter to process that character.
Words and numbers
If \@parsecode sees a character with category 11, it will start parsing either a word or a number. The characters
that Tcode makes letter (i.e., category 11) are _ and the numbers 0-9.
These are added to the default ones: a-z and A-Z. Any language package
acting on top of Tcode can change that.
The first thing the macro has to do upon seeing a category 11 character is to decide whether it is a word or a number.
The obvious way to do that in TeX is to test #1 to see if it is a digit, the clever way being \ifnum`#1 etc.
But Tcode does something better. It executes the macro \@+#1. If #1 is not
in the range 0-9, this macro will either equal \relax or disappear, as a result of the
\condCsname, according as to whether the engine is not Luatex or it is, and will do nothing.
If #1 is a digit it will change \parsecode to \NcodeParseNumber. (If one is the “dollar”
char the macro already knows it is not a digit).
It is very common to see TeX code testing the argument to a macro against different possibilities, with
a series of nested \if's and \else's, or using \ifcase. The most efficient
way to do that in a general purpose programming language is by checking the argument in a table or a hash,
to see whether it is present. Most TeX
programmers don't realise that TeX provides a hash, and an extremely easy one to use. It is TeX's internal hash,
where it looks the meaning of each control sequence and active character token. Therefore, we can test whether
#1 is a digit just by checking the existence of \@+#1, writing
\ifcsname @+#1\endcsname, say.
But we can even do better: we define \@+0, \@+1, etc. to
what we want in case the test is positive. Therefore, we just write
\csname @+#1\endcsname
and let it act.
Tcode takes advantage of this TeX's internal hash repeatedly.
Thus, \parsecode will be \NcodeParseWord or \NcodeParseNumber. In the
first case, \NcodeParseWord takes one letter at a time until a non-letter is found. There are some
extra complications because it handles the “dollar”, a configurable
escape character. By default there is no dollar. Once a non-letter is found it calls \HookAndPrintWord:
\def\NcodeEndWord@kernel#1{
\let\parsecode\@parsecode
\HookAndPrintWord{#1}
\exP\parsecode\exP #1%First expand \fi, then \parsecode #1
}
% What is to be printed is the contents of \WordToPrint.
% #1 is the next token in the input. It may be needed for \PrePrintLongHook.
\def\HookAndPrintWord#1{
\letcs\FormatToApply{Format\TcodeLang @\the\WordToPrint}
\PrePrintLongHook#1
\ifx\FormatToApply\undefined \let\FormatToApply\FormatOtherWords \fi
\wordbox{\FormatToApply{\the\WordToPrint}}
}
(The first line of \HookAndPrintWord is not exactly like that. Look for \aftergroup in this manual).
Suppose that the word just read is int. It will be the contents of \WordToPrint,
that is a token register. Supposing that \Format⟨Lang⟩@int is defined, \HookAndPrintWord will end up expanding to
\let\FormatToApply\Format⟨Lang⟩@int
\PrePrintLongHook#1
\wordbox{\FormatToApply{int}}
The hook is defined by the user; by default it does nothing. \wordbox is either \hbox
or empty.
\NcodeParseNumber is similar to \NcodeParseWord. It keeps consuming digits
and other characters that can be found in a number. When the end is reached it executes \NcodeEndNumber:
\def\NcodeEndNumber@kernel{
{\FormatNumber{\the\WordToPrint}}\egroup % end of special catcodes for _ and maybe others
\exP\@parsecode\exP %So that \@parsecode reads the #1 that follows, after executing the \fi.
}
The \egroup closes the group opened by \NcodeParseNumber:
\def\NumberCatcodes{\catcode`\_=12 \catcode`.=11 }
\def\NcodeParseNumber{\bgroup\NumberCatcodes\Ncode@Number}
\NumberCatcodes may be redefined. For example, Tcode_Ccode.tex redefines it to also include
\catcode`\'=11. If you need something completely different for parsing numbers, for example if letters are not
allowed as part of a number, it is better that you redefine completely \NcodeParseNumber.
As can be seen, \NcodeEndNumber does not call a hook before printing the number. If you want
to perform some other action besides printing, just redefine \NcodeEndNumber.
These control sequences that end in @kernel are the defaults for control sequences that can be
redefined. Thus, Tcode includes
\let\NcodeEndWord\NcodeEndWord@kernel
\let\NcodeEndNumber\NcodeEndNumber@kernel
among others. If you want to redefine \NcodeEndNumber you need only do it;
your definition will be in force.
\NcodeNoLetter
By default, \NcodeNoLetter does nothing, but subsequent layers (typically the language package) can
define specific actions for specific characters. The kernel looks at the control sequence \NcodeNoLetter⟨Lang⟩@#1,
where #1 is the character that follows. For example, if the current language is C and the
character that \@parsecode is processing is &, Tcode will check
\NcodeNoLetterC@&. If this is undefined, \NcodeNoLetter just prints the character &.
If on the contrary it is defined, the idea behind \NcodeNoLetter is that the final expansion of
\NcodeNoLetter &
be
\NcodeNoLetterC@&
thereby yielding complete control of the parsing of the input to that control sequence.
If one looks at the definition of \@parsecode above, one sees that it ends in
\NcodeNoLetter #1\fi\parsecode
Therefore, if \NcodeNoLetterC@& (say) is to take complete control of the input,
\NcodeNoLetter must somehow jump over the tokens \fi\parsecode.
To this end Tcode defines \NcodeNoLetter essentially as
\def\NcodeNoLetter#1{
\ifcsname NcodeNoLetter\TcodeLang @\string#1\endcsname%Typically, this is false
\letcs\parsecode{NcodeNoLetter\TcodeLang @\string#1}
\else #1\fi
}
That is, it lets \parsecode equal to the control sequence in question; in
the above example, \NcodeNoLetterC@&. Thereby this macro will take control of the input
when the next \parsecode is expanded.
This way, the authors that define the macros for specific characters don't need to modify \parsecode,
or even to know that it exists. Further, it is not necessary that you know the way \NcodeNoLetter build
a control sequence. There is \TcodeDefineSpecial that takes care of defining
the command in the same way that \NcodeNoLetter is going to check for it. Look at that section for examples
on its use, and the sections that follow that one for higher level alternatives.
Comments that may include the @ escape character (or other) and the prefixes that may
be prepended to a string or other elements make the definition of some of these non-letters complicated. You
may study the ones in Tcode_Ccode.tex and Tcode_pycode.tex.
Predefined noletters
Because Tcode is not written for any specific language, it defines no \NcodeNoLetter@⟨char⟩
macro for any “normal” characters. It defines
| \let\NcodeNoLetter@\end=\relax |
| \NcodeNoLetter@^^M |
| \NcodeNoLetter@\^^M |
| \NcodeNoLetter@« |
| \NcodeNoLetter@‹ |
(In the kernel, \TcodeLang is empty). The first one finishes the parsing in the inline environments
(in the long ones; the short ones don't use \@parsecode). The next two ones catch the end of the line
in the Code display environment. The last two detect the escape environments. These last two command shown
are the ones defined under Luatex; for non-luatex the definition is more complicated.
Note that #1 in \@parsecode is the next token in the input. It will typically be a character,
but it may also be a control sequence token. \Ncode, \ncode and \nscode place an \end
to signal the end of the input, as can be seen in their definitions above. With the above definition, when \@parsecode
finds the token \end in front of it, it will let \parsecode equal to \relax, thereby
stopping the parsing of code.
\PrePrintHook
When \@parsecode finishes parsing a word, it invokes a hook before printing it. A user who wants to
take advantage of this hook must know that, at the point it is expanded,
\WordToPrint Is a token register that holds the parsed word.
\FormatToApply Holds the definition of the format to apply.
For example, if the word just parsed is int, and if \Format@int (or \Format⟨Lang⟩@int
if \TcodeLang is not empty) has been defined as \FormatKeyword,
those two tokens are as if defined by
\WordToPrint={int}
\def\FormatToApply{\FormatKeyword}
Therefore, \FormatToApply can be used to recognise the category of the word. But if \Format@int
has been defined as \bold\color{blue}, say, that will also be the definition of \FormatToApply
and the category cannot be recognised. See \MakeWordSlow
below in Word definitions.
One of the possible uses of the hook is to send entries to the index. Another use is to temporarily format a word in
a different way. Say you have \Format@int defined in some way, but in a particular piece of code you want
it formatted in italics. You can then set \PrePrintHook to a macro that checks whether \WordToPrint
is int and if so change \FormatToApply. (Though in this case it could be better to
temporarily change \Format@int). Yet another possibility is to count how many times each word appears.
If \FormatToApply is \undefined when the hook is invoked, it means that
the word in \WordToPrint is not a recognised word. Tcode provides a basis for a common hook:
\def\HookOnlyKnown{\unless\ifx\FormatToApply\undefined\KnownWordHook\fi}
Thus, if you set
\let\PrePrintHook\HookOnlyKnown
\def\KnownWordHook{⟨some definition⟩}
You will be defining a hook that acts only when the word is a recognised one.
There are two similar bases for a known-word hook: \HookOnlyKnownE and \HookOnlyKnownEE,
the definitions of which may be looked up in Tkernel-utils.tex.
\PrePrintLongHook
The hook invoked by \NcodeEndWord is actually \PrePrintLongHook (\ident
does call \PrePrintHook directly). It takes as #1
the next character in the input. This hook is primarily intended for programmers of the language packages,
that should not touch \PrePrintHook, leaving it for further layers.
\PrePrintLongHook can be used to modify \parsecode in some way because
the word in \WordToPrint is a special one that signals that what follows has to be parsed
in a specific way (for example, include), or to prepare the formatting of the ensuing code
because of the character #1 that follows.
For example, in the code
nom[a+r]=r"Hélène"
The two r should get different formats. The first one likely \FormatOtherWords, while the
second one will be formatted as string, as part of the string r"Hélène". To be able to format
the word r as a string when it is a string prefix, it is necessary to inspect the character that follows it.
It is instructive to study how Tcode_Ccode.tex and Tcode_pycode.tex achieve this by
means of \PrePrintLongHook.
The token #1 is provided for the macro for the purposes of inspection; the macro
shall not print it. That token still lies ahead in the input string; what the macro gets is a copy of
the token. The default definition for \PrePrintLongHook in Tcode.tex is
\def\PrePrintLongHook#1{\PrePrintHook}
That is, it ignores #1 and calls \PrePrintHook.
\CSkipBlanks
This command is used, for example in a \PrePrintLongHook, as
\CSkipBlanks\parsefilename
This switches \parsecode to a mode
where it keeps printing the blank characters it finds (spaces and tabs), until a non-blank
is found, whence it will place the command \parsefilename in front
of the next character, and this control sequence takes control of the ensuing input.
Thus, \parsefilename in the example above should be a control sequence
that you have defined.
Here is a complete example of use:
\def\INCLUDE{include}
\def\PrePrintLongHook#1{
\edef\temp{\the\WordToPrint}
\ifx\temp\INCLUDE \CSkipBlanks\parsefilename \fi
\PrePrintHook
}
{\catcode`\^^M=13 %
\gdef\parsefilename#1^^M{{\color{green}#1}\@parsecode^^M}
}
With this definition, the following code may produce the following output:
\Code
include A long file name
include
this is not a file name
\endCode
include A long file name
include
this is not a file name
This example also serves to exhibit what happens if the remainder of the line consists only of blanks
(and in particular if there are no more characters in the line): The normal parsing of code is resumed
and the command \parsefilename is never executed. This will also be the behaviour if the line
ends with a \ splice char.
Tcode provides also \CSkipBlanksPure, that behaves like \CSkipBlanks
but places the user-provided control sequence at the first non-blank, even if it is the end of the line.
You should use this if you want to handle ^^M or \^^M as the first possible non-blank.
These macros may be used also in the long inline environments (the short ones don't use \parsecode).
In this case you should take into account when defining the macro that will be placed before
the first non-blank, that the code that lies ahead, the characters to be parsed, are closed by \end.
Control sequences
These are treated by \@parsecode in almost the same way as any non-letter:
they are just “printed”; i.e., placed in the list being built. This means that you can
place any control sequence in the argument to \ncode, etc. (the long ones) and
\Code, as long as it doesn't take arguments:
\def\str{{\it str\/}}
\def\member{{\it member\/}}
\ncode{offsetof(\str,\member)}
Control sequences that take arguments will not work properly because
first \@parsecode absorbs the macro, then it eventually places it in the input
to TeX, followed by other tokens from the definition of \@parsecode and \NcodeNoLetter
(in particular, the first token that the control sequence will see ahead of it is \fi).
There is one difference in \n(s)code and \Code,
but not in \Ncode, in the way \@parsecode handles a control sequence with
respect to other non-letters: it temporarily makes space behave as it usually does in TeX, so
that spaces following the control sequence are ignored (they will also be ignored after single character
ones). This matches user expectations better than keeping the spaces printed, all the more since
\scan(tex)tokens, used by
\n(s)code,
places a space after each control sequence in its argument, and this would usually result in a
spurious space, difficult to fix (\let\*\unskip and placing \*
after the control sequence, or modifying the definition of the control sequence to end in
\ignorespaces; see Spaces above).
Escapes
The normal processing of tokens by \@parsecode can be escaped in different ways.
The dollar
“The dollar” refers in the Tcode jargon to the character used
to escape the next character within words. In the package's first versions it was $ and hence its name.
Later it was made configurable and the default switched to ` (whence language packages had
to deactivate it if they didn't want it). Now by default there is no dollar. A character is made
the dollar by writing (e.g., with `),
\TcodeMarker{`}
The dollar acts as follows:
{\DoDollar#1}
where #1 is the character following the dollar. Therefore, if
you want to change what the dollar does, you need to redefine \DoDollar. The default
definition of \DoDollar is \it or \itshape
(according to whether or not the latter is defined); i.e., it will typeset the next character in italics (or slanted) shape:
\TcodeMarker{`}
\ncode{`T func(`T x, `T y)}
\ident{int`N_t}
The first line will print the three T in italics; the second line, the letter N:
T func(T x, T y)
intN_t
Parsecode will take for the parsed word, placed in \WordToPrint, the word as it
is written, including the dollar. Thus, in the first example above it will take `T and
look for \Format⟨Lang⟩@`T, while in
the second example \WordToPrint will be int`N_t and
\HookAndPrintWord will look for \Format⟨Lang⟩@int`N.
The argument following the dollar char must be a single character. It will not work if you
place a grouped argument, as in `{Type}; you will get error messages or a weird output.
The dollar works in all the environments, even those that do not use \@parsecode.
All of those that guess the format will take the word as written, as explained two paragraphs above.
If a dollar char appears isolated, not followed by a letter or digit, it is printed and it does not
act as dollar. A dollar char as the last one of its word is wrong.
If you want to remove an active dollar you may write either of
\TcodeMarker{}
\TcodeMarkerNone
(The first one calls the second one).
\TcodeMarkerNone does not exactly suppress the dollar, as you can check by looking
at its definition. If you really want to have Tcode with no dollar, input Tutils-removedollar.tex,
or input Tcode_nodollar.tex instead of Tcode.tex. But this cannot be undone. Again,
you may look at the file in order to understand why this is so.
Multilanguage support
Multilanguage support complicated the handling of the dollar character. The solution adopted
by Tcode is that the dollar character is a global setting, affecting all languages. Therefore, you cannot
use as dollar a character that is needed as non-letter in any of the langauges you are using.
For example
\input Tcode.tex
\input Tcode_xxxcode.tex
\input Tcode_Ccode.tex
\TcodeMarker{/}
The user wants the character / to be used as dollar. But Tcode_Ccode.tex
assigns a special meaning to that character. Therefore, the following code will feature mixed results
\begin{Code}
val/den; //Error
val /= den; /* Error again */
val /den;
\end{Code}
The / in val/den will act as dollar, as well as that
of /den, supposing TeX could reach there. All others will generate errors, because a dollar must be
followed by a letter.
This user should deactivate the dollar when typesetting C code.
« » and ‹ ›
If \@parsecode sees a « character it will process the text between
« and » as normal TeX code enclosed in a group. Text enclosed
in ‹ › will be processed the same way and further processed by \@parsecode
as if it had been there from the beginning.
\MakeWord{fun}{Function}
\MakeWord{S}{Struct}
\Code
fun= S.«\FormatStrMember fun»;
fun(x, y);
\endCode
In this example, we instruct Tcode that fun is to be
formatted as Function and S as a Struct. But in the first line
of C code we want the second fun to be typeset as a structure member.
Therefore we write «\FormatStrMember fun». This piece of
TeX code will be skipped by \@parsecode.
\def\fori{for(i=0; i<n; i++)}
\ncode{‹\fori› *p++= A[i]*B[i];}
In the above example the user has defined \fori as an abbreviation
of for(i=0; i<n; i++), presumably because he wants to use it multiple times. Once
the macro is expanded the resulting text has to be processed normally by \@parsecode.
These escape environments work only when they are caught by the usual \@parsecode
processing. In particular, they will not work within strings and comments, that are processed by
the language package on top of Tcode. Within those elements, the angular environments
don't make much sense, since macros taking arguments can be executed normally, except that
the { } characters do not have any special meaning within \Code, and the
environments « » and ‹ › cannot change
that if they are absorbed as part of the argument to a macro (for example, the language macro
for formatting a string). The packages for C and python that come with Tcode make
{ } within comments have their usual meaning in TeX, by default.
Tcode provides @ as a character that may be used as an escape character,
taking one argument and processing it. This is achieved by making @ active. This,
in turn, can be activated and deactivated. Normally it is off. Language packages can
take advantage of this by activating the @ in particular situations. This is
typically done for comments, so that within comments some text can be typeset differently
from the rest of the comment:
{\FormatAtEsc #1} % This is how the escaped text is placed
\def\FormatAtEsc{\color{black}\FormatOtherWords} % And the default definition of \FormatAtEsc
The @ is activated by invoking \MakeAtEscape. There
is no command for deactivating it, you just make the change local, or write \catcode`@=12
(or 11, as you may need) to deactivate it. Typically, a language package includes \MakeAtEscape
as part of the setup for comments, if it wants to provide that possibility.
Example:
b= a>8 || a==3; // There is a sequence point after @{a>8}
This may typeset something like
b= a>8 || a==3; // There is a sequence point after a>8
Activating @ by invoking \MakeAtEscape does not change the catcodes of {
and }. These are normal non-letters (i.e., cat. 12) within \Code, unless
a later layer has changed that in the hook \CodeDefineCommands. Therefore, if you call
\MakeAtEscape in the setup for your comments, you will likely also want to set { }
to act as grouping characters there.
Control sequences
Finally, it must never be forgotten that a control sequence taking no arguments can always act
as the more general escaping mechanism. For example
\def\Type{{\it Type\/} }
\def\m{$m$}
\begin{Code}
\Type mmul(\Type x, \Type y); # The width is \m
\end{Code}
Code
Code is the display environment:
\begin{Code}
pairs = [(1, 'one'), (2, 'two'), (3, 'three'), (4, 'four')]
pairs.sort(key=lambda pair: pair[1])
pairs
\end{Code}
If you don't have \begin{} and \end{} defined, you have to use
\Code and \endCode instead.
Configurable parameters
Here is a list of all the parameters or macros involved in the layout of a Code block, and their default values/definitions:
\Codeskipbefore | 0.75\baselineskip plus 0.25\baselineskip minus 0.25\baselineskip | |
\Codeskipafter | \dimexpr 0.42\baselineskip-\parskip\relax plus 0.25\baselineskip | |
\CodeLeftInd | 4pt | |
\CodeRightInd | 4pt | |
\NLpenalty | 1000 | |
\setlineboxwd
\CodeFramewd | 0.6 | |
\CsnippetFrame | black | |
\CsnippetBkg | white | |
\ApplyFrameColor | \empty / \color{\CsnippetFrame} | |
\ApplyBkgColor | \empty / \color{\CsnippetBkg} | |
|
The definition of \setlineboxwd is too long to fit in the table. \ApplyFrameColor and \ApplyBkgColor
default to \empty if no colour is being applied or to the other definition shown if colour is applied. By default, no colour
is applied, the frame appearing black and there being no background.
The layout
The displayed code is not placed into a box, as that would prevent page breaking
within it. Instead, it is output as a vertical series of boxes and rules:
| skipbefore
|
|
|
| hrule (the frame)
|
| hrule (clearance)
|
| box1
|
| box2
|
| ...
|
| boxlast
|
| hrule (clearance)
|
| hrule (the frame)
|
|
|
| skipafter
|
The before and after skips are defined as
\def\Codeskipbefore{0.75\baselineskip plus 0.25\baselineskip minus 0.25\baselineskip}
\def\Codeskipafter{\dimexpr 0.42\baselineskip-\parskip\relax plus 0.25\baselineskip}
These definitions can of course be modified.
Tcode determines the width of the rules and boxes that form the displayed code:
\newdimen\lineboxwd
\unless\ifdefined\setlineboxwd
\ifdefined\linewidth
\def\setlineboxwd{
\lineboxwd=\linewidth
\advance\lineboxwd-\CodeLeftInd
\advance\lineboxwd-\CodeRightInd
\advance\CodeLeftInd\@totalleftmargin %Local change
}
\else
\def\setlineboxwd{
\lineboxwd=\hsize
\advance\lineboxwd-\CodeLeftInd
\advance\lineboxwd-\CodeRightInd
}
\fi
\fi
And then each instance of Code executes, local to a group, \setlineboxwd. Thus,
the width of the displayed code is that of the surrounding text minus \CodeLeftInd at the left
and \CodeRightInd at the right. These two dimensions default to 4pt. Note the enclosing
\ifdefined\setlineboxwd; if the definition of \setlineboxwd
does not fit your needs, you may provide an alternative one.
The default width of the frame is 0.6pt. The frame can be suppressed by setting \CodeFramewd to 0pt.
The clearance before the first box and after the last box is defined in \N@abbe@cle (above and below clearance):
\hbox{\kern\CodeLeftInd\hbox to\lineboxwd{\NLvrule\ApplyBkgColor\leaders\hrule height3pt\hss}\NLvrule}}
\NLvrule is a piece of the vertical sides of the frame. Even if those sides look as single segments, they are actually
composed of many small pieces, one for each box that compose the display.
The above and below clearances are not applied if there is no frame (i.e., \CodeFramewd is 0pt) nor is colour applied (\ifx\ApplyBkgColor\empty),
for in this case the clearance would just result in an enlargement of the above and below skips surrounding the display.
The snippet may have a coloured frame and/or background:
\def\CsnippetNoColor{
\let\ApplyFrameColor\empty
\let\ApplyBkgColor\empty
}
\def\CsnippetColor{
\def\ApplyFrameColor{\color{\CsnippetFrame}}
\def\ApplyBkgColor{\color{\CsnippetBkg}}
}
The default is \CsnippetNoColor.
The definition of \ApplyBkgColor when we want no colour nor frame should be exactly like that,
for otherwise the code setting \N@abbe@cle will not recognise that there is no background colour,
and further the code placing the background of each of the boxes with code that compose the display will not
recognise that either.
Vertical layout
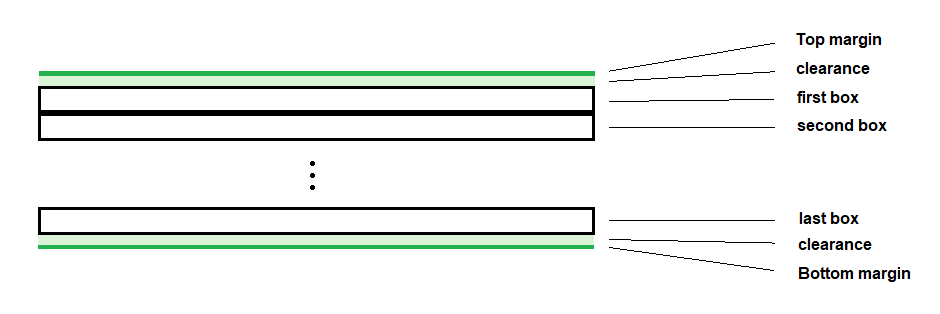
The clearance is necessary because without it the letters from the topmost box will touch the frame, or if there is no frame
they would get right to the border of the coloured background. But if there is no frame nor background colour, the clearance
is not inserted. The macro that inserts the top frame and the clearance is \CodeOpen. The clearance is 3pt wide.
Between consecutive boxes there is the penalty \NLpenalty. This is one of the configurable parameters.
Its default value is 1000. This is a fairly high penalty: we don't want to break a code snippet in two pages, if possible.
If the user writes either of \break, \nobreak or \goodbreak in a line of code, the penalty
after that line will be
-10 000 (forces a break) 10 000 (inhibits a break) nothing,
respectively.
If a page break occurs between two boxes the glue \CodeBreakglue, defaulting to 0pt plus 10pt, is inserted
between the boxes, and will remain at the bottom of the first page. This is needed for pages that contain only code. Without it there
would be no stretchability at all in the page, leading to an underfull vbox. It is configurable:
\CodeBreakglue 0pt plus 10pt
If you want to suppress page breaking in the whole display write \CNolinebreaks right after \Code. But if
you want it suppressed always, just set \NLpenalty to 10 000.
\begin{Code}\CNolinebreaks
for(uint i=n; i--;){
c+=*p**p; p++;
s+=*p**p; p++;
}\goodbreak
for(uint i=n; i--;){
c-=*q++;
s-=*q++;
}
\end{Code}
The previous example suppresses page breaking within it, but allows it after the first }. (If \CNolinebreaks is
in effect, \goodbreak can be thought of as an \allowbreak).
Horizontal layout
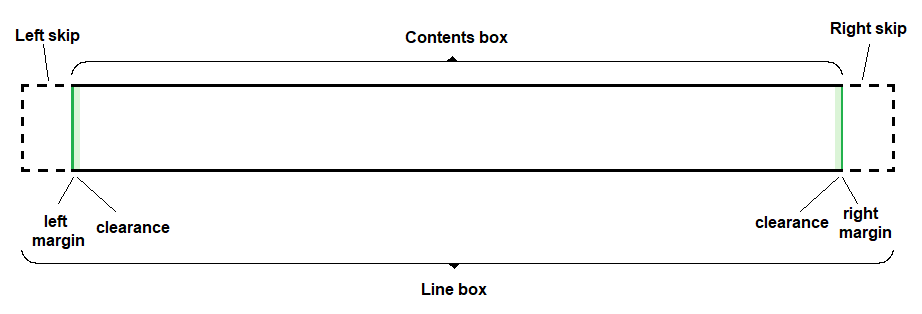
Each line is a box with \CodeLeftInd and \CodeRightInd kerns at its ends, enclosing
a box of width \lineboxwd. Thus, even if the
appearance of the display is that the left and right indentations are outside of the box containing the displayed code,
they are actually inside each of the horizontal boxes composing the display. Then comes the box with the apparent
display: the contents box. In the Tcode source, it is called \box0. Within it, and
from the border to the center, there are at both sides the frame and the clearance.
Here the clearance is 2pt and is always inserted. If there is no frame nor background colour, the user can
adjust the value of the left and right indentations if he wants exactly a certain width of apparent indentation. Finally,
abutting the left clearance begins the code written by the user.
The insertion of \kern\CodeLeftInd, the opening of the contents box, the rule with
the piece of left margin and the \kern2pt for the clearance are effected by \openlinebox.
The symmetric components are inserted by \closelinebox. If there is background colour, this latter macro
further places a box underlying exactly the contents box with a rule filling all of it, having for colour the background colour.
The presence or not of background colour makes \CodeAfterLineZero select one or other variant for
\openlinebox, as can be seen below in the definition of \CodeAfterLineZero.
Verbatim characters
Code typesets spaces as they appear, even at beginning of line, but not after control sequences.
See Spaces for a more detailed explanation. Tabs are translated to a fixed number of spaces:
\def\NcodeTab{\ \ \ \ \ \ }
This default definition can obviously be changed. But the package intentionally avoids
faking actual tabs; that would require width bookkeeping and slow down the macro unnecessarily. Users
get along well with Code's fixed-width tabs.
In addition to the changes for inline environments, Code makes { and }
of category 12. But within « » and ‹ › they are back as normal TeX braces.
It also makes tab active, so that it can act as \NcodeTab, as well as ^^M (the end
of line). The hook \CodeDefineCommands can be used, among other things, to undo the
change for the braces or to change other catcodes.
Code setup
The timing of the different actions that constitute the setup of the environment; i.e., what is executed when the user types
\Code or \begin{Code}, has been carefully thought.
It is best reviewed by following it:
\def\Code{\par
\vskip\Codeskipbefore
\begingroup\setlineboxwd
\let\wordbox\relax %Used in inline mode to prevent hyphenation. Here, not needed.
\offinterlineskip
\CodeLineZero
}
\par \vskip\Codeskipbefore \begingroup needs no explanation. Then comes
\setlineboxwd, that computes the width of the display, as explained above. The next line is present because individual words
within the code snippet are printed as \wordbox{\FormatToApply{\the\WordToPrint}}, where
\wordbox may be \hbox if we want the word not to be broken (hyphenated). Here this is superfluous,
so \wordbox is made equal to \relax. You may redefine \wordbox to process the word somehow
if you wish. Then \offinterlineskip, so that the code that processes the environment (i.e., the Tcode kernel)
has complete control of the boxes it places. Finally comes \CodeLineZero.
The purpose of \CodeLineZero is to process the code that the user may have placed right after \Code
or \begin{Code}, then yield control to the normal processing of input in the environment. That line zero
is a good place where to locally change the category of words, as in
\begin{Code}\MakeWord{f}{Function}
void f(int n, int *p, int *q){
while (n-- > 0)
*p++ = *q++;
}
\end{Code}
This is the same as
{\MakeWord{f}{Function}
\begin{Code}
void f(int n, int *p, int *q){
while (n-- > 0)
*p++ = *q++;
}
\end{Code}
}
\def\CodeLineZero{\SetCatcodesLineZero\CLineZero}
\def\SetCatcodesLineZero{\SpecialCharsInIdent\catcode`\^^M=13 }
\def\CLineZero#1^^M{#1\CodeAfterLineZero}
Thus, \CodeLineZero simply changes the catcodes of characters that may appear in identifiers, so that
the user can type, for example, \MakeWord{Point_float}{Type} (note the _),
then it just places the text that the user has put in that first line so that it gets executed. It does not change the catcode
of %. Hence, its presence in line zero will make the next line also to be taken within the argument of
\CodeLineZero. This is useful for writing several lines of definitions, as in
\begin{Code}%
\MakeWord{F}{Macro}%
\MakeWord{G}{Macro}%
\MakeWord{H}{Macro}
...
\end{Code}
Note that the last line of definitions is not closed by %.
After the line zero has been read and executed, \CodeAfterLineZero is invoked. This is the
macro actually performing the setup for Code:
\def\CodeAfterLineZero{
\ifx\ApplyBkgColor\empty
\let\closelinebox\closelineboxN
\ifdim\CodeFramewd=0pt \let\N@abbe@cle\relax\fi %If there is no frame nor background,
\else %we don't need the clearance.
\let\closelinebox\closelineboxC
\fi
\let\break\CBreak \let\nobreak\CNobreak \let\goodbreak\CGoodbreak
\SetCodeCatcodes %Those of \ncode, plus ^^M and others
\CodeDefineCommands %Hook for the language package
\the\CodeHook\CodeOpen%A hook for the user and the top part of the frame
\CodeLineCheck %Start parsing the first line
}
The first \ifx selects one macro or another for setting up the boxes that constitute each line of the display. Then
the three macros \break, \nobreak and \goodbreak are given definitions that work in the environment.
\SetCodeCatcodes includes also
\SetEscapeChars \let\SetEscapeChars\relax
See Escape sequences for an explanation. The assignment of
that control sequence to \relax is so that it does not spend time reactivating what is already activated;
typically, \SetEscapeChars appears in the expansion of the code for strings.
Then follows the hook for the user and the macro \CodeLineCheck that does what the comment says.
The interested reader may look up the definitions of the macros that compose \CodeAfterLineZero in
Tkernel-Code.tex and other files from the kernel.
The macro that starts parsing a line is called \CodeLineCheck because the first thing it does is to check
if the end of the environment has been reached, by looking if the next token on input is \end or
\endCode. The check is done with \ifx; therefore, if you define
\let\endpyCode\endCode and you write \begin{pyCode} ... \end{pyCode}
it will work:
\def\CodeLineCheck#1{
\IfCodeEnd#1\exP\CodeEnd % \IfCodeEnd performs the check
\else\openlinebox\exP\CBeginLine\fi
#1
}
\openlinebox puts some rules, kerns and penalties and opens the box that will contain the line
(thereby opening also a group).
Ending a line and beginning the next one
There are four ways of reaching the end of a line in the source file, signalling the end of a physical line in the output.
The macro \@parsecode may see ^^M or \^^M ahead of it. The latter happens when
the line is ended by a \ character; the ^^M is placed by TeX at the end of every line, and taken into
account as if it were there from the beginning. These are the easy ways of ending a line:
\TcodeDefineSpecial{^^M}{\closelinebox\CodeLineCheck}
\TcodeDefineSpecial{\^^M}{\splicechar\closelinebox\openlinebox\CBeginSplice}
Recall that \CodeLineCheck is the normal way of beginning a line. Thus, ^^M does nothing
beyond closing one line and starting parsing the next one. \^^M by contrasts includes two hooks:
\splicechar and \CBeginSplice, the default definitions of which are
\def\splicechar{\SpliceCharTasks{\FormatSpliceChar\\}}
\let\SpliceCharTasks\empty \let\FormatSpliceChar\empty
\let\CBeginSplice\@parsecode
Thus, \splicechar decomposes itself in two hooks, while \CBeginSplice defaults to
the normal parsing of code. Note in particular that \CBeginSplice skips the check for \end or
\endCode: the code cannot end after a line-splicing character. If the user wants the last line of the code snippet
to end in a \ character, he should type \\ (and this will just print \, it will not be considered
a line-splicing character). Neither is the \CBeginLine hook executed after a line ended by \^^M.
This is because the beginning of the next line is not the beginning of a logical line. If you want to change that, just
redefine \CBeginSplice.
If your language does not perform line splicing you don't need to do anything in particular. If you want a line
ended in \ and that character should not be considered a splicing character, you need to type \\,
whether your language considers a \ at the end a splice character or not. The special TeX character \
followed by the ^^M closing the line forms the token \^^M. If your language does not do
line splicing, just don't write that.
Before seeing the other two ways of finishing a line, we will consider the case where the closing ^^M is
grabbed as the delimiter token of a macro, typically the one processing a line comment. In these cases it is better to
reinstate the ^^M in the input, preceded by \@parsecode, so that the normal parsing takes
care of it. Thus, the definition for a line comment introduced by the character # could be
\def\CommentLine#1^^M{{\FormatComment\##1}\@parsecode^^M}
\TcodeLetSpecial#=\CommentLine
(Though for a standard definition as this one it is simpler to use \DeclareCommentChar
instead of \TcodeLetSpecial or \TcodeDefineSpecial).
The other two ways of finishing a source line arise when the ^^M or \^^M appears as part of
the argument to a macro, for example \ParseString. Tcode does not define any such macro, but
language packages may want to define macros for parsing a string or a comment where its argument is delimited. For example,
the code for C includes the definitions
\def\CodeParseCString#1"{ ... }
\def\CCommentLineM#1^^M{//#1\egroup\@parsecode^^M}
In relation to these definitions, consider the input
|
\begin{Code}
s="line one
line two"
\end{Code}
|
\begin{Code}
s="line one\
line two"
\end{Code}
|
\begin{Code}
h=2/(1/a+1/b) // The harmonic mean\
of the two quantities.
\end{Code}
|
In the first case the string will include an embedded ^^M; in the second one, and embedded \^^M,
as will the comment from the third example.
The macro formatting the comment or string will place its argument, #1, and therein the embedded token will go. Therefore,
Tcode must define it in a way that it closes the box and opens the box of the next line, and reapplies the current format, or
provides a way for the next layers to do it. The tokens ^^M and \^^M are set up by \SetCodeCatcodes as
\let^^M\EOLMiddle
\let\^^M\SlashMInCode
And the definitions of these macros are
\def\EOLMiddle{\egroup\closelinebox\openlinebox\CBeginInTheMiddle}
\def\SlashMInCode{\splicechar^^M} % Equivalent to {\splicechar\EOLMiddle}
There are two differences with respect to the regular way of reaching the end of a line. First, an extra \egroup is inserted, and
second, the next line starts being parsed with \CBeginInTheMiddle. An explanation of these facts is provided in the next section.
Beginning parsing a line
As a result of the different ways a line may end, the first command that is executed in a line, having the user input in front of it,
is one of
\CBeginLine % Regular beginning, after line ended by ^^M
\CBeginSplice % After a line ended by \^^M
\CBeginInTheMiddle % After an uncaught (by \@parsecode) ^^M or \^^M
The first of these is also the one that \Code inserts for its first line of input code (the line
after line zero). Its definition and that of two related commands are
\def\BeginLineBlanks{\let\parsecode\SkipInitialSpaces\parsecode}
\let\CBeginLine\BeginLineBlanks
\let\CFirstNoBlank\@parsecode
The user or the language package may change \CBeginLine. Its default definition is \BeginLineBlanks,
that keeps printing spaces and tabs without any special treatment until a non-blank character is found or the end of the
line is reached. In the latter case it closes the line and opens the next one normally. Some languages may want to perform
some action upon the first word or token in a line, but often they want to skip initial blanks. For this reason, when
\BeginLineBlanks finds its first non-blank character it stops and calls \CFirstNoBlank, that will
take that character as its argument. Its default definition is simply \@parsecode, as can be seen above.
Thus, if a package wants to perform some action upon the first non-blank character, it must redefine \CFirstNoBlank.
The default definition for \CBeginSplice is simply \let\CBeginSplice\@parsecode.
The definitions relevant for \CBeginInTheMiddle are
\def\CBeginInTheMiddle{\bgroup\CContinueInTheMiddle}
\let\CContinueInTheMiddle\relax
The rationale behind this definition is that \CBeginInTheMiddle is invoked when the #1,
for example in
{\FormatString "#1"}
is being read by TeX and #1 is something like line one^^M line2 or
line one\^^M line2. In either case an \EOLMiddle will be expanded. This will insert an
\egroup, to close the group that it supposes that has been opened (in the example above this is
the { before \FormatString). And \CBeginInTheMiddle reopens that group
so that the parsing and printing of #1; i.e., of what remains of #1 after the ^^M or \^^M,
continues normally. Actually, for the printing to proceed as it was before the line break, \CContinueInTheMiddle
should be defined to \FormatString, but its default definition is \relax. The macro for parsing
a string must redefine that command if it expects its argument to span several lines. Thus, the definition cannot
be as simple as {\FormatString "#1"}.
Maybe the language package (or a subsequent package) wants to perform some action upon the first non-blank of every
physical line, even those that are part of a string or other construct. In these cases \CBeginInTheMiddle
should be redefined:
\let\CBeginInTheMiddle\SkipSpacesInTheMiddle
SkipSpacesInTheMiddle keeps printing spaces and tabs, just as SkipInitialSpaces,
and when it finds the first non-blank it inserts the code \bgroup\CContinueInTheMiddle. Thus,
the difference between the default definition for \CBeginInTheMiddle and this one is that the code
\bgroup\CContinueInTheMiddle, that resumes the parsing (of the argument of which the EOL is part)
is placed not at the beginning of the line, but after its initial blanks. In this case
the programmer probably wants to redefine \CContinueInTheMiddle, too.
Setting \CBeginInTheMiddle to \SkipSpacesInTheMiddle may also be preferred
when comments are being typeset in a variable width font, there are comments that span several lines and
we want the first non-blank of the comment in every line to appear at a fixed position, as in
g=2+3*v; g=1+v*g; /* This is precise enough for our needs
and faster than the exact computation.
(Though may be the difference is negligible.) */
This would be the code typed in the TeX document. If comments use, say, regular italics,
the last two lines would appear in the “printed” file (say, the pdf), too much to the left. By letting \SkipSpacesInTheMiddle
act, the first blanks of each line are not typeset with the format for comments, but with no format in particular
and will thereby retain its fixed width.
Some users may prefer that the comment appears as it would, had those lines been typeset in an
editor with syntax highlighting and with comments in regular italics, and therefore do not redefine
\CBeginInTheMiddle, but just write more blanks in those two lines.
Redefining \CContinueInTheMiddle
Redefining \CContinueInTheMiddle (or \CBeginInTheMiddle)
locally by the macro that processes a possibly multiline argument (a string, a comment... ) is tricky because
the definition will be placed in the line where #1 appeared but it has to apply to the next
line, and these two lines are in different groups. The simplest possibility, namely \global\let or
\global\def, is right because no subsequent \CContinueInTheMiddle will appear unless a similar
situation is reached again: a line including a ^^M or \^^M grabbed as part of the argument to some macro.
That macro will in turn modify the definition of \CContinueInTheMiddle according to its needs. Therefore:
Always redefine \CContinueInTheMiddle if you absorbe an EOL within the argument to some macro
(unless you redefine ^^M in a completely different way) and you can always make that definition global.
The need to write code like \global\let\CContinueInTheMiddle\FormatString\CContinueInTheMiddle
is so common, that Tcode provides a command for that, \MultiLineFormat, to be used like
\def\SomeCommand#1]]{\MultiLineFormat{String} ... }
\DeclareNoLetterLong<#1>{Label}{\MultiLineFormat{Label}#1}
If you still want your redefinition of \CContinueInTheMiddle not to propagate outside of the enclosing Code
block, there is a way to do it. Tcode_Ccode-pp.tex does that (for a different command) in \PrePrintMakeMacro.
See also the rationale for an easy solution that unfortunately is not possible.
The most common situations of multiline constructs, namely strings and line comments, are handled by the kernel
through the commands \DeclareString and \DeclareCommentChar. There is also a
\DeclareStringLike, for string-like constructions where the limiting character is not " but
a different one, and the format to apply not necessarily that for strings. Furhter, there is \DeclareNoLetterLong
for constructions introduced by more than one character, as //, $(, [[, etc.
(and \DeclareNoLetter that may suffice if your construction cannot span several lines).
See the \DeclareNoLetter and Howto's
sections in the “Language packages” chapter for explanations on how to use these commands.
Some times you may want to have the lines of code in a separate file. For this cases Tcode provides the command
\Codeinput:
\Codeinput{some-file.tex}
The contents of some-file.tex are typeset as if preceded by \Code and
succeeded by \endCode. There is no “line zero” here.
stdin and stdout
Tcode provides two further environments for displaying verbatim text. Their names stdin
and stdout suggest their uses. It often happens that when a document needs to typeset computer code
it also needs to show what the input or the output would be in some circumstances. The environments \stdin
and \stdout are very simple. They are not intended to format the output on a console applying syntax
highlighting. To this end, a language package on its own has to be developed and use the environment Code.
These two environments share with Code the parameters \Codeskipbefore, \Codeskipafter,
\CodeLeftInd, \CodeRightInd, \lineboxwd and the macro \setlineboxwd.
They never have frame, but they add blank indentation at the left and the right equal to \CodeFramewd so that
their text appears aligned with that of the code displays. Their background colours are specified by the macros
\StdOutBkg and \StdInBkg. Again, if no colour is desired, they should be \let equal to \empty.
The text in each line box is preceded by \FormatText, a macro that is \let equal to \FormatStdIn
or \FormatStdOut respectively, that in turn default to empty. The hook for package writers is \StdioDefineCommands;
the hook on entry (for final users and package writers alike) is \StdioHook. The macro \StdioEnvLetter expands to either o or i
according to whether the environment is stdout or stdin. By the time the hooks are invoked \FormatText
has already been assigned (therefore, both \StdioDefineCommands and \StdioHook can modify it).
There is no dollar in these environments. If you want it, just include \MakeDefineDollar in \StdioHook.
|
\begin{stdin}
item 2.26 0
\end{stdin}
|
\begin{stdout}
The limits are:
48.45 48.58 2.14 2.35
\end{stdout}
|
Summary of hooks
Here are listed hooks intended for the final user or package, not for the language packages. These are shown
at the end of the chapter on language packages, here.
| \TcodeHook | \SelectCodeFont |
| \ShortNcodeHook | \LongNcodeHook |
| \CodeHook |
| \StdioDefineCommands | \StdioHook |
| \PrePrintHook |
| \DoDollar |
| \NcodeTab | |
| \Codeskipbefore | \Codeskipafter | (macros) |
| \CodeLeftInd | \CodeRightInd | (dimens) |
| \setlineboxwd |
| \CodeFramewd | | (dimen) |
| \NLpenalty | | (count) |
| \CodeBreakglue | | (skip) |
| \CsnippetFrame | \CsnippetBkg | (names of colours) |
| \ApplyFrameColor | \ApplyBkgColor |
In addition to these hooks, some switches select one or another behaviour:
\Ident(Not)AllowHyphenation, to allow or preclude hyphenation within words
in the inline environments \ident, \n(s)code and \Ncode.
In the other inline environments it is always activated (TeX's default); if you want to suppress it in these environment, place the code in an \hbox
or use any other standard way in TeX to preclude the hyphenation, or just use \ncode.
\TcodeMarker{c}, sets the character c as the “dollar”.
\TcodeMarkerNone and \TcodeMarker{} suppress it.
\SkipSpacesAfterCS. Used by the environments that skip spaces after a control sequence: \n(s)code
and \Code. Let it to \relax if you don't want those spaces to be skipped.
\Csnippet(No)Color. Switch between these two settings:
\let\ApplyFrameColor\empty
\let\ApplyBkgColor\empty
| \def\ApplyFrameColor{\color{\CsnippetFrame}}
\def\ApplyBkgColor{\color{\CsnippetBkg}}
|
Finally, \setlineboxwd may be given any definition that overrides Tcode's default, even before including the package.
The language file, when it exists, is named after the convention Tcode_⟨Lang⟩code.tex.
Thus Tcode_Ccode.tex, Tcode_pycode.tex, Tcode_Rustcode.tex, etc. In many
cases their would-be contents are placed directly in the Tcode_⟨Lang⟩.tex file and there is no
Tcode_⟨Lang⟩code.tex file.
The language package defines commands specific for the language but not for any particular formatting of the code. It does
place formatting commands at required places, like \FormatComment and \FormatString, but it does
not define those commands. More precisely, it should provide default definitions that do nothing.
Characters in identifiers and numbers
The language package should redefine the macros \SpecialCharsInIdent, \OtherCharsInIdent
and \NumberCatcodes, if needed. For example, in order to add , (comma) as an allowed character
within numbers you could write
\exP\def\exP\NumberCatcodes\exP{\NumberCatcodes \catcode`,=11}
And to remove _ from identifiers you'd write
\exP\def\exP\SpecialCharsInIdent\exP{\SpecialCharsInIdent \catcode`\_=12}.
\SetIdentCatcodes uses \SpecialCharsInIdent and does not need \OtherCharsInIdent,
so it is unlikely that you need to modify it. (Curiously, the first language package developed, Tcode_Code.tex, needs to modify it).
\TcodeDefineSpecial
This is the most general macro for defining an action upon a non-letter character caught by
\@parsecode. Therefore, it applies to \Ncode, \n(s)code
and the Code environment. \TcodeDefineSpecial#1 is a shortcut for
\exP\def\csname NcodeNoLetter\TcodeLang @\string#1\endcsname
and the macro that this defines will have the user input in front of it when it
is expanded.
For example, if a langauge package wants to define " to parse the string that it opens, the author may write
\TcodeDefineSpecial"#1"{{\FormatString"#1"}\@parsecode}
This code is really defining the macro (let us suppose that \TcodeLang is empty)
\NcodeNoLetter@", that takes one argument delimited by a second ".
The effect of that definition is that when \@parsecode sees a " character in front of it
it replaces itself by the macro \NcodeNoLetter@", that henceforth takes control of the input. The "
that triggered this action has disappeared from the input; therefore, \NcodeNoLetter@" must print it,
as can be seen in the definition above. From the point of view of the programmer it looks as though the first "
is taken as part of a delimited argument, which for all practical purposes amounts to the same.
Whatever the user macro does, the last thing it must do is to restore control to \@parsecode,
so that this macro can continue parsing the input.
Here is another example, for handling a line comment introduced by #:
\catcode`\^^M=13
\TcodeDefineSpecial{#}#1^^M{{\FormatComment\##1}\@parsecode^^M}%
\catcode`\^^M=5 %
Note the position of \@parsecode here.
The need to handle " as string delimiters, a specific character as introducing line comments and
maybe other delimiters is so common, that Tcode provides some shortcuts for the language packages to achieve this
with a minimum knowledge of the package. They are explained in the next section, Line comments and strings.
A more general, but not as
fast (when executing) alternative to \TcodeDefineSpecial is \DeclareNoLetter.
There is also \TcodeLetSpecial, that can be used as in the following example:
\def\parsestring#1"{{\FormatString"#1"}\@parsecode}
\TcodeLetSpecial"=\parsestring
And there is \TcodeUnDefineSpecial, that removes the definition, as in \TcodeUnDefineSpecial".
Sequences of more than one character
It is common in programming languages that a particular construction is introduced not by one,
but by two or even three characters, as $(identifier), say, where it is the sequence $(
that signals that the following text needs special treatment.
Another well-known example are comments in C, introduced by either //
or /*. Here is how the package for C handles that:
\chardef\C@fwdSlash=`/ % May be modified by syntax highlighting.
\def\MaybeCComment#1{
\ifcsname CComment\string#1\endcsname \exP\lastnamedcs
\else
\def\next{\C@fwdSlash\@parsecode #1}%Print the consumed / and let #1 be parsed again
\exP\next
\fi
}
\TcodeLetSpecial/=\MaybeCComment
(The definition for non-Luatex makes the csname again instead of \lastnamedcs).
And definitions for \CComment/ and \CComment* follow. They are
shown in Comments.
This is a task normally for syntax highlighting files. Tcode provides \TcodeFormatSpecial:
\TcodeFormatSpecial={Operator}
Here, Operator is a format that must be defined either before or after this declaration. See
Commands for defining formats. The non-letter for which the format
is being defined is ‘=’.
The previous declaration will expand to
\def\NcodeNoLetter@={{\Format⟨Lang⟩Operator =}\@parsecode}
For cancelling one declaration like this you may use either \TcodeUnDefineSpecial or \TcodeUnFormatSpecial,
that have identical definitions: \TcodeUnFormatSpecial=.
The language package needs to handle strings, comments and in general any character that introduces a special
piece of code. This can be achieved by means of \TcodeDefineSpecial, as explained in the previous section.
Because strings and line comments are so common, the kernel provides some commands to define them, as well
as any other string-like construction: a sequence of characters opened and closed by the same character:
\DeclareString
\DeclareStringLike{'}{CharLiteral}
\DeclareCommentChar{#}
\DeclareString is a shortcut for \DeclareStringLike{"}{String}.
\DeclareString and \DeclareStringLike make the escape sequences \t,
etc. active within the string. See Escape sequences for a description of these.
If you do not use these commands for handling your strings you should invoke \SetEscapeChars if
you want them working within strings.
DeclareNoLetter
DeclareNoLetter
\DeclareNoLetter provides a higher level alternative to \TcodeDefineSpecial when there
is more than one introducing character and when there are different sequences of characters introducing something
special that begin with the same first character, as [ and [[, or //, /* and
a plain /, that does not introduce anything. \DeclareNoLetter and \TcodeDefineSpecial are
incompatible: For each first (or only) character of the sequence only one of the two can be used.
The last one used will take precedence.
There are examples of the use of \DeclareNoLetter in example_userlanguage.tex:
\DeclareNoLetter $(#1){Punct}{Ident}
\DeclareNoLetter $((#1)){Punct}{Strong}
\DeclareNoLetter $#1{Punct}{}
The first declaration specifies that in a sequence of the form $(text), the
opening $( and the closing ) will be formatted as \Format⟨Lang⟩Punct,
while the enclosed text will receive the format of Ident's. The second one specifies formatting
for sequences of the form $((text)), in this case the text receiving the Strong
format. Note that Tcode will match the longest possible sequence. The two declarations can be specified in either order.
The third declaration specifies what to do when a $ character is not followed by
any of ( or ((; hence, not followed by (. It says that the $ is to
be formatted like Punct(uator) and the character following it will not receive any special
formatting. This is usually what is intended. For example, a $$ in the code will result in
something like $$. See “A single character”
below for other possibilities.
Tcode will not retract to the last matched pattern if the character that follows it
is the first one of a longer sequence but the ensuing ones do not match that longer sequence.
Thus, if you write
\DeclareNoLetter $((#1)){Punct}{Strong}
\DeclareNoLetter $#1{Punct}{}
\ncode{$$ $(name) $((name))}
you will get something like
$$ $(name) $((name))
This is usually the desired behaviour.
It is not necessary that you redefine the catcodes of the characters that appear in the prefix part (before the #1),
except for %. You may even write something like \DeclareNoLetter ${#1}{Punct}{Ident}.
But you do need to temporarily redefine those of the suffix, except }. Typically, the suffix part consists only
of closing (in the usual sense) elements, that all have category 12 in TeX, except for the aforementioned },
that Tcode takes care to handle.
A single character
There are three possibilities for a character that is not followed by a recognised pattern. Let's say we have
defined the pattern $(#1) and the code contains the sequence $prime(.
A special action on the letter p takes place only in the second case, where it matches the #1
of the definition.
If the three possibilites above are applied to the sequence $$(name), the outcome may be respectively
$$(name) $$(name) $$(name)
\DeclareNoLetterP and \DeclareNoLetterLong
There are two other variants of \DeclareNoLetter. The command \DeclareNoLetterP will make
Tcode call \PrePrintHook before printing the delimited text, with the text stored in
\WordToPrint and the format in \FormatToApply, as with any other call to \PrePrintHook:
\DeclareNoLetterP[[#1]]{}{Attribute} % Will call \PrePrintHook on #1 before printing it
\DeclareNoLetterLong takes as its last argument, not the name of the format to apply to the text,
but TeX code to be applied on it, with #1 representing the argument:
\DeclareNoLetterLong[[#1]]{}{\splitattribute #1::\relax}
\def\splitattribute#1::#2\relax{
\def\one{#1}\def\two{#2}
\ifx\two\empty
etc.
}
Here is another curious example:
\DeclareNoLetterLong^{#1}{}{\InBracesReparse #1\end}
\def\InBracesReparse{\ChangeSomeSettings \@parsecode}
The author takes advantage of \@parsecode to process the text within ^{ }, after
possibly some changes. The changes will be local and the \end causes \@parsecode to stop.
A closing ^^M and multiline argument
The last closing character can be an end-of-line (and, if so, usually the single one); i.e., ^^M in TeX. For example,
line comments like in C, but restricted to a single physical line, could be defined by
\DeclareNoLetter//#1^^M{Comment}{Comment}
There is no need to temporarily redefine the catcode of ^^M, \DeclareNoLetter
takes care of that.
If we want the argument to possibly span several lines, we need to use \DeclareNoLetterLong,
typically in combination with \MultiLineFormat:
\DeclareNoLetterLong//#1^^M{Comment}{\MultiLineFormat{Comment}#1}
This approach is also needed for arguments that may span several lines but need not be closed
by ^^M, like in
\DeclareNoLetterLong/*#1*/{Comment}{\MultiLineFormat{Comment}#1}
Howto's
String prefixes
String prefixes are usually formatted like the string that follows, and in any case they are only a string prefix if a string follows.
Therefore, the code (i.e., TeX) needs to know what follows in order to format that letter or word. For situations like this
\PrePrintLongHook is provided. When that macro is expanded the word just read (that may be a string prefix)
is retrieved by writing \the\WordToPrint. The macro takes as argument the character that follows but does not
consume it: the normal processing (or your macro) will absorb it afterwards. Otherwise expressed, the macro gets a copy
of the character that follows. Its default definition ignores that character and just calls \PrePrintHook. If you
modify it, you must remember to call \PrePrintHook if the \WordToPrint is not a string prefix
or anything else special handled by you. Here is the definition of \PrePrintLongHook that achieves this:
\def\PrePrintLongHook#1{
\ifx"#1\exP\CheckForStrPrefix\else
\ifx'#1\exP\CheckForStrPrefix
\fi\fi
\ifStrPrefix\@FormatToApply{String}\fi
\PrePrintHook
}
Here \CheckForStrPrefix is a macro that sets \ifStrPrefix equal to \iftrue
or \iffalse according as to whether \the\WordToPrint is a recognised
string prefix or not.
\@FormatToApply{⟨Format⟩} sets \FormatToApply
to the supplied format. The latter macro holds the format that will be applied to the word about to be printed (in
this case, the string prefix). That is, it sets \FormatToApply to \Format⟨Lang⟩⟨Format⟩.
It does so with \def, not with \let.
It is not rare that the language wants to format all words preceding a certain character the same way.
For example, all identifiers preceding ( as functions. This is also achieved through \PrePrintLongHook:
\def\PrePrintLongHook#1{
\ifx(#1\@FormatToApply{Function}\fi
\PrePrintHook
}
Or maybe only if the word is not already a recognised one:
\def\PrePrintLongHook#1{
\ifx\FormatToApply\undefined
\ifx(#1\@FormatToApply{Function}\fi
\fi
\PrePrintHook
}
Or maybe we want to parametrise the format to apply. In this case we would replace
\@FormatToApply{Function}
by \@FormatToApply{\PreParenFormat}, and define a default for \PreParenFormat.
The simplest kind of comments are those introduced by a single character and extending to the end
of the physical or logical line, as those in python. There is a dedicated command for these:
\DeclareCommentChar{#}
This will apply the format “Comment” (likely \FormatpyComment;
the macro \DeclareCommentChar will take care of this) to the leading character #
and to all the characters found until the end of the logical line; i.e., until the first line that is not finished
by a \ character in the source code. That character escapes the end-of-line in TeX itself.
If continuing a comment this way over several lines is not legal in your language (in python it is not),
just don't end a line in a Code environment in a \. If you want that character to
appear on the output for didactic purposes, finish the TeX line by \\.
If the comment is introduced by two or more characters we can use \DeclareNoLetter
or \DeclareNoLetterLong:
\DeclareNoLetterLong//#1^^M{Comment}{\MultiLineFormat{Comment}#1}
\DeclareNoLetterLong/*#1*/{Comment}{\MultiLineFormat{Comment}#1}
Here, the first {Comment} specifies that the delimiters are
to be typeset with the format “Comment”. These are // in the first case
and both /* and */ in the second case. The second braced argument is the code
to apply in order to typeset the text of the comment. The macro \MultiLineFormat will take
care that the format “Comment” is applied to each line that the comment
may span. To understand why this is needed, and not just a \lang@Format{Comment},
see the Rationale.
If the comment cannot span several lines the definition can be made simpler:
% Comment introduced by // like in C, but that cannot span several lines
\DeclareNoLetterLong//#1^^M{Comment}{Comment}
Inline comments are typically not included in the inline environments (\ncode, etc.). In case you want
to support that you cannot use \DeclareNoLetter(Long), but need
to use the lower level \TcodeLetSpecial and insert in \CodeDefineCommands a
switch, as exemplified here for the python language:
\def\pyCommentLine#1\end{{\FormatpyComment\##1}\@parsecode\end}
\TcodeLetSpecial#=\pyCommentLine
\def\CodeDefineCommands{
⟨other tasks⟩
\let\pyCommentLine\pyCommentLineM
}
\catcode`\^^M=13 %
\def\pyCommentLineM#1^^M{\FormatpyComment\##1}\@parsecode^^M}%
\catcode`\^^M=5 %
Or writing \lang@Format{Comment} instead of
\FormatpyComment, if we want to support a user that has eliminated all py infixes.
Note the position of \@parsecode in both cases: The macros do not consume either \end or the ^^M,
but put it back in the input and let \@parsecode take care of it.
Continuing with the approach of using Tcode's \TcodeDefineSpecial for defining the comments, if
the comment is introduced by more than one character, the definition of the first one should be as explained
in Sequences of more than one character.
Continuing the example there, the macros that are invoked when the second character is met could be
\catcode`\^^M=13 %
\exP\def\csname CComment/\endcsname#1^^M{{\FormatCComment//#1\egroup}\@parsecode^^M}%
\exP\def\csname CComment*\endcsname#1*/{{\FormatCComment/*#1*/\egroup}\@parsecode}%
\catcode`\^^M=5 %
If you need to set up more things than just the format, see the following section.
Tcode provides @ as an escape character within comments (or anywhere else), but it has
to be activated with \MakeAtEscape. If you want to use this @ or any other character as escape
character, or if you want to change the catcodes of braces so that they are again TeX's grouping characters, or to change
any catcode for whatever reason, the catcode change has to take place before the argument is read. In this case, neither
\DeclareCommentChar nor \DeclareNoLetter are of any use.
That is what the packages provided for C and python do. Pieces of the code needed to achieve that
in C have already been displayed here and there. To recap, here is how the whole definition could look like:
\chardef\C@fwdSlash=`/ % May be modified by a syntax highlighting definition.
% Code to execute when the first / is encountered. #1 is the character that follows that /.
\def\MaybeCComment#1{
\ifcsname CComment\string#1\endcsname \exP\lastnamedcs % True if #1 is / or *
\else
\def\next{\C@fwdSlash\@parsecode #1}%Print the consumed / and let #1 be parsed again
\exP\next
\fi
}
\TcodeLetSpecial/=\MaybeCComment %Consumes the /
\exP\def\csname CComment/\endcsname{\bgroup⟨more tasks⟩\SetupCComment\CCommentLine}
\exP\def\csname CComment*\endcsname{\bgroup⟨more tasks⟩\SetupCComment\CCommentOld}
\catcode`\^^M=13 %
\def\CCommentLine#1^^M{//#1\egroup\@parsecode^^M}
\def\CCommentOld#1*/{/*#1*/\egroup\@parsecode}
\catcode`\^^M=5 %
\def\SetupCComment{\FormatCComment\MakeAtEscape\catcode`\{=12 \catcode`\}=12 }
(Or remaking the \csname if \lastnamedcs is not available.)
The reason for the ⟨more tasks⟩ will be seen in the next section.
Line striding
When a string or comment may span several lines of input, and you cannot use
\DeclareNoLetterLong{\MultiLineFormat{〈Format〉}#1}
because you have to do more tasks than setting the format, the definition is more complicated. Here is how
the package for C achieves it for comments:
{\bgroup\global\let\CContinueInTheMiddle\SetupCommentLine\SetupCommentLine\CommentLine}
\def\CommentLine#1^^M{//#1\egroup\@parsecode^^M}
The first line here is the actual definition of \CComment/ in Tcode's supplied package for C,
completing the ⟨more tasks⟩ placeholder that was shown at the end of the previous section.
Tcode has to know how to re-setup after the line break. As explained in the chapter on Tcode,
the macro that parses and formats the comment (or whatever) only needs to
define \CContinueInTheMiddle to achieve this. Thus, the second \SetupCommentLine is the one setting up the
comment about to be typeset, while the first one is the second argument to \let; after each line break that the argument
#1 may contain, when opening the next line Tcode will execute \CContinueInTheMiddle, that has
been \let equal to \SetupCommentLine. In Beginning parsing a line
it is explained why making the definition global is right.
Here is a different approach, in case you need more code than just the \global\let assignment:
%Defer the setup until we meet an actual ^^M or \^^M.
The last ^^M here will use the original definition, and the other gets forgotten
\def\EOLinString{\global\let\CContinueInTheMiddle\FormatString⟨maybe more stuff⟩\egroup\bgroup^^M}
\def\CodeParseString#1"{{\let^^M\EOLinString\FormatNextString "#1"}\@parsecode}
The file Tcode_pycode.tex uses this approach for strings in Code.
If you don't need to change catcodes you may use \DeclareNoLetterLong, that is simpler than a chain
of definitions:
\DeclareNoLetterLong//#1^^M{Comment}{\global\def\CContinueInTheMiddle{%
\FormatComment⟨other tasks⟩}\CContinueInTheMiddle#1}
Making a definition “global” for the whole Code snippet
In some cases you may want to define a command in the middle of a Code snippet and have that definition
in force for the rest of the snippet. This is difficult to achieve because the code in that environment is enclosed in more than one group
within the snippet itself. Here we show as example how the package for C achieves it for the word following a
#define macro in the code:
\MakeWord{\the\WordToPrint}{Macro}
% Now make it "global". \closelinebox restores itself
\edef\closelinebox{\expandonce\closelinebox\noexpand\MakeWord{\the\WordToPrint}{Macro}}
Thus, no matter how many groups the code within each line of \Code is enclosed in, \closelinebox closes them all.
Therefore, the definition has to be squeezed after \closelinebox, and this requires modifying \closelinebox.
The usual method of saving the original definition in, say, \orig@closelinebox, then having the modified definition
restore itself is not necessary, because \closelinebox already restores itself upon closing the groups.
Defining the operators
Another thing that the language package may do is to define a macro that facilitates the handling of all the operator (a.k.a. punctuator)
characters by subsequent layers:
\def\DoCOperators{
\do= \do> ⟨many more like these⟩ \do;
}
\def\FormatCOperators#1{
\def\do##1{\TcodeFormatSpecial{##1}{#1}}
\DoCOperators
}
For example.
Multilanguage support
The Lang infix
If you want your definitions to be usable in a document that may typeset code in other languages you need to write
\ThisIsLanguage{⟨Lang⟩}
at the beginning of your definitions. For example, \ThisIsLanguage{C}.
This will make all your \Format... macros as well as the definitions for your special characters
have the ⟨Lang⟩ word inserted in it. Suppose your language is called Lex. Then, instead
of \FormatComment, for example, you will get \FormatLexComment, assuming you are using
the \Tcode... macros for defining them:
\Tcode(Define/Edef/Copy)Format,
\TcodeDefineSpecial, \TcodeLetSpecial.
The exact form of a format command, for the format “Comment” for instance, whether it is \FormatComment,
\FormatLexComment or something else, is seldom needed. The word “Comment” is most often
provided as an argument to a control sequence that builds the format command. For example, \@FormatToApply{Comment},
\TcodeDefineFormat{Comment} or \lang@Format{Comment}. The latter is provided to expand
to \Format⟨Lang⟩Comment, even within \edef's. Language
packages may prefer to write the command directly because it leads to clearer definitions. Compare for example the
following definition in python, written with direct commands in the first case and with the help of \lang@Format
in the second one:
\def\FormatpyPreParen{\FormatpyFunction} % May be changed
\def\FORMATpyBIT{\FormatpyBuiltInType}
\def\OpenParenpyTasks{
\ifx\FormatToApply\undefined \let\FormatToApply\FormatpyPreParen
\else\ifx\FormatToApply\FORMATpyBIT \def\FormatToApply{\FormatpyBuiltInFunction}
\fi\fi
}
\edef\FormatpyPreParen{\lang@Format{pyFunction}} % May be changed
\edef\FORMATpyBIT{\lang@Format{BuiltInType}}
\edef\OpenParenpyTasks{
\unexpanded{\ifx\FormatToApply\undefined \let\FormatToApply\FormatpyPreParen}
\unexpanded{\else\ifx\FormatToApply\FORMATpyBIT \def\FormatToApply}{\lang@Format{BuiltInFunction}}
\fi\fi
}
Final users may also prefer the direct command.
An advanced user that is not mixing several languages in a document may prefer to completely get rid of the ⟨Lang⟩
infix, and redefine \ThisIsLanguage to do nothing. This will break direct uses of the commands as the one above.
Such a user will have to write
\let\FormatpyBuiltInType\FormatBuiltInType
\let\FormatpyBuiltInFunction\FormatBuiltInFunction
and maybe others, after all his format definitions for the code to work. (Or use \def
instead of \let and write the above anywhere).
You may choose to support those users or not. If you do you will have to replace direct commands by the
\lang@Format{} construction and \def's by \edef's, or duplicate
your definitions according to the value of \TcodeLang. For example, the language package for python
includes the definition
\edef\SetuppyCommentNoEsc{\lang@Format{Comment}}
and the definitions
\edef\FORMATpyBIT{\lang@Format{BuiltInType}}
\if*\TcodeLang*
\def\OpenParenpyTasks{
\ifx\FormatToApply\undefined\@FormatToApply{\FormatpyPreParen}
\else\ifx\FormatToApply\FORMATpyBIT\def\FormatToApply{\FormatBuiltInFunction}
\fi\fi
}
\else
\def\OpenParenpyTasks{
\ifx\FormatToApply\undefined\let\FormatToApply\FormatpyPreParen
\else\ifx\FormatToApply\FORMATpyBIT\def\FormatToApply{\FormatpyBuiltInFunction}
\fi\fi
}
\fi
\unless\ifdefined\FormatpyPreParen \def\FormatpyPreParen{Function} \fi
\def\FormatPreParen#1{\def\FormatpyPreParen{#1}} % For single language use
The last definition is independent of the previous duplicity. More precisely, a user that is not mixing several languages
in a document and has not tampered with \ThisIsLanguage may still prefer to use \FormatPreParen
instead of \FormatpyPreParen.
The two definitions of \OpenParenpyTasks only differ in \FormatBuiltInFunction vs. \FormatpyBuiltInFunction.
They could have been merged into a single one by using \@FormatToApply{BuiltInFunction}. The definitions
above are slightly faster when expanded.
\if*\TcodeLang* is the idiomatic way of testing for an empty \TcodeLang.
If several languages are being used in the same document the user should not use \FormatPreParen
because it is not clear which language it is referring to. Other language packages may have defined \FormatPreParen too.
There is no problem in language packages defining those general commands that may be also defined in other
language packages as long as it is just an alternative for the user for a macro with a proper name. Commands such
as \FormatPreParen, \FormatFunction, \FormatMemberDefaults, etc.
are senseless when several languages coexist, and defining them is innocuous.
Language switching
The command for switching languages is \TcodeSelectLanguage; e.g., \TcodeSelectLanguage{py}.
This will automatically select your language if such is the argument. In many cases your language package doesn't need to do anything
else. However, if you have redefined some of Tcode's defaults or use some macro with a name that may be shared
by other langauge packages, you should define a control sequence named \ReloadLang@⟨Lang⟩
that restores those definitions every time your language is selected. For example, the macro \ReloadLang@py is
defined (essentially) as
\def\ReloadLang@py{
\let\PrePrintLongHook\PrePrintLongHook@py
\let\CodeDefineCommands\CodeDefineCommands@py
\let\FormatNextString\FormatStrpyDefault
\let\ifStrPrefix\iffalse
\def\StrPrefixTasks{\let\ifStrPrefix\iffalse\exP\PrePrintStrPrefixHook}
\def\PrePrintStrPrefixHook{
\if f\the\WordToPrint\let\SetupStrpyCodes\SetupFormattedpyString\fi
\PrePrintHook
}
}
The first two definitions within \ReloadLang@py are redefinitions of Tcode hooks, that must be
restored every time the language is loaded. The next ones are definitions that the author of the package believes that might
be present in other packages with the same names.
The macro \ReloadLang@⟨Lang⟩ is called by the kernel every time your language
is loaded, provided it is defined. You may also define a macro \UnloadLang@⟨Lang⟩,
that will be called, if defined, when your language is unloaded before loading another language.
A language may be activated within a group, as in:
\TcodeSelectLanguage{py}
...
{
\TcodeSelectLanguage{C}
...
}
In this example, when \TcodeSelectLanguage{C} is
invoked, Tcode will call \UnloadLang@py, if this macro is defined, then select
the language C, then call \ReloadLang@C, if it is defined. When the group is closed
Tcode does nothing; the definitions that were in force before the group are restored by TeX.
The macro \ReloadLang@⟨Lang⟩ does not
need to reload the definitons of Format's, nor those of Word's, nor those of special characters defined with
\TcodeDefineSpecial, \TcodeLetSpecial or \TcodeFormatSpecial,
because all these include the ⟨Lang⟩ infix in their name.
CCode, pyCode, etc.
For every language that is declared at least once with \ThisIsLanguage, Tcode
defines the environment ⟨Lang⟩Code, which is like Code
but selects the language Lang. If Lang is for instance For,
the commands that the kernel defines are
\def\ForCode{\begingroup\TcodeSelectLanguage{For}\Code}
\def\endForCode{\endCode\endgroup}
Therefore you can write \begin{ForCode} ... \end{ForCode}.
Summary of hooks
These are the commands provided by the kernel so that language packages modify them to fit their needs.
Any of these commands that you modify has to be included in your \ReloadLang@⟨Lang⟩,
if you intend your package to be used alongside other languages in the same document. They come in two groups:
commands that are provided on purpose as hooks and commands that the language package may modify,
even if they are not intended primarily as hooks. These two groups are
| \SpecialCharsInIdent | \OtherCharsInIdent | \NumberCatcodes |
| \SetEscapeChars | \SetnEscapeChars |
| \PrePrintLongHook |
| \CodeDefineCommands |
| \SpliceCharTasks | \SlashMInCode |
| \CBeginLine | \CFirstNoBlank |
| \CBeginSplice |
| \CBeginInTheMiddle | \CContinueInTheMiddle |
| \WordOrNumber | \NcodeParseWord | \NcodeEndWord |
| \NcodeParseNumber | \Ncode@Number | \NcodeEndNumber |
| \TcodeDefineSpecial{^^M}* | \TcodeDefineSpecial{\^^M}* |
| \splicechar |
| \BeginLineBlanks |
| \EOLMiddle |
The two commands marked with *, in case you
redefine them, must be redefined with no infix, so you'll need to temporarily make \TcodeLang empty
(but note that a \ReloadLang@⟨Lang⟩ must not make
global any redefinition of a command from the kernel).
If you redefine some command not in these two lists, in addition to including its definition in \ReloadLang@⟨Lang⟩
you must include its restoring to its default in \UnloadLang@⟨Lang⟩.
General
These files are named ⟨Lang⟩highlighting.tex or, if there may be more than one for the same
language, ⟨Lang⟩highlighting_xxx.tex. For example, Tcode comes with three
files for the C language: Chighlighting_1.tex, Chighlighting_2.tex and Chighlighting_iso.tex.
The purpose of this file is to declare some categories of words and to define a formatting for them. The latter achieves the former;
that is, by the mere fact of defining \Format⟨Lang⟩Function, say, the category
Function becomes declared for the language Lang.
There are essentially two commands, exemplified here with the category Function:
\TcodeDefineFormat[C]{Function}{\color{green}} \TcodeDefineFormat{Function}{\color{green}}
\TcodeEdefFormat[C]{Function}{\color{green}} \TcodeEdefFormat{Function}{\color{green}}
The bracketed first argument is the language for which we are defining the category.
If it is missing, the macro will take the expansion of \TcodeLang for it. The second command expands with \edef its last argument,
the one giving the format definition.
There are two commands for copying the definition of one format into another:
\TcodeCopyFormat[C]{BuiltInFunction}{Function} \TcodeCopyFormat{BuiltInFunction}{Function}
\TCopyFormat{BuiltInFunction}{Function}
This copies the definition of \Format⟨Lang⟩Function
into \Format⟨Lang⟩BuiltInFunction. The second command does not admit the first, bracketed argument; it will always
take \TcodeLang. It further omits the update-kernel-format check, explained two sections below.
Suppose you or someone has defined
\TcodeDefineFormat{Function}{\color{green}}
and you want to use that format to format some text. Typically you don't need to do that because words
to be formatted as functions are declared with \MakeWord{sqrt}{Function}
or another of the high-level commands. Further, this is also the right way to temporarily make a word of a certain category,
by placing the declaration in a group, or by cancelling it later with \KillWord. Finally, for typesetting arbitraty
text with a given format there is the command \fcode{⟨Format⟩}{arbitrary text}.
But suppose that you need to refer to that format. It may be \FormatFunction or \Format⟨Lang⟩Function.
It may be that you know which one it is. If you wrote some language support for yourself and never used the multilanguage
support commands \ThisIsLanguage and \SelectLanguage, it will be the first form. If you are
providing multilanguage support and do not care about possible users that hack the \ThisIsLanguage macro
to suppress the Lang infix, it will be the second form.
But if you don't know which form it will take when your macros are expanded, or if you do not care about the
form that Tcode gives in its internals to the commands holding the formats, you should use either of
\lang@Format{Function} \Format{Function}
The right one is available only if by the time the kernel is going to define it, it has not already been
given a definition (by whoever). This construction expands to the command in question. Further, that command is the final expansion
if this code is expanded inside an \edef. Thus, you may use it like
\edef\SomeFormat{\lang@Format{Function}} \exP\let\exP\SomeFormat\SomeFormat
A common use of the format command is to assign it to \FormatToApply, either by \let or by \def.
To this end there is a dedicated command:
\@FormatToApply{Function}
That defines \FormatToApply to expand to the command representing the format. Thus,
it could be defined as \def\@FormatToApply#1{\edef\FormatToApply{\lang@Format{#1}}}
(but its actual definition skips \lang@Format).
If you want \FormatToApply to be let equal to the command holding the format, you should write
\@FormatToApply{Function} \exP\let\exP\FormatToApply\FormatToApply
Some formats are known to the kernel. These are
\FormatOtherWords \FormatNumber \FormatSpliceChar \FormatAtEsc
These formats are used by the Tcode kernel layer as spelled here; that is, they do not include the ⟨Lang⟩ infix.
You don't need to do anything special for defining them. Just write
\TcodeDefineFormat{Number}{ ... }
and it will work properly.
But if you directly define \def\FormatJavaNumber{ ... }
it will not work. You'd need to further write \let\FormatNumber\FormatJavaNumber.
All three macros \TcodeDefineFormat, \TcodeEdefFormat and \TcodeCopyFormat take care of this: they end with the code
\edef\temp{#1}\ifx\TcodeLang\temp\condCsname UpdateKernelFormat@#2\endcsname\fi
If the format being defined is one of the kernel formats and the language given in #1
(#1 here stands for \TcodeLang if the [#1] argument was not explicit) matches the contents
of \TcodeLang, this code will expand, e.g. with #1 equal to Java and #2 equal to Number, to
\let\FormatNumber\FormatJavaNumber
\condCsname stands for either \csname or \begincsname. The latter is available in Luatex.
It is not necessary that you define these formats. If they are undefined for a particular language, the kernel will pick a default
definition for them. The default definitions don't do anything, except for \FormatAtEsc, which is
\color{black}\FormatOtherWords
(And the default for \FormatOtherWords in turn does nothing).
Subcategories
You may define subcategories, thus:
\TcodeDefineSubcategory[py]{Scope}{Keyword} \TcodeDefineSubcategory{Scope}{Keyword}
These definitions will result in \protected\def\FormatpyScope{\FormatpyKeyword},
assuming in the second case that \TcodeLang is py.
The macro uses \def and not \let so that if \FormatpyKeyword,
continuing the example above, is changed later, the change will be also reflected in words declared as Scope.
This is the intent of subcategories: they are not defined for the purpose of formatting each of them in a different
way, but for having a finer classification of words, that the user may use for any other purpose (the category
of each word can be accessed in \PrePrintHook, for example).
The definition resulting for \FormatpyScope in the example above is independent of the particular
syntax highlighting chosen by the user. For this reason, the subcategory definitions can be placed in a file
that can be input by any syntax highlighting file. Tcode comes with C_subcategories.tex and
py_subcategories.tex. Still, a particular syntax highlighting may choose to signal out some
subcategory. For example, Chighlighting_iso formats the PredefinedConstants
differently from the rest of keywords. Two approaches can be taken with respect to this in the subcategory
definitions file. One is simply to insert the above definitions. Then, if a category definitions file wants
to override one of them, it does so after inputting the file. Alternatively, the subcategories file may
check whether for each subcategory if it has already been defined and refrain from defining it with
\TcodeDefineFormat in that case. This way the subcategories file may be input at any point
in the category definitions file.
The files C_subcategories.tex and py_subcategories.tex use the latter approach
because it feels more natural to input the subcategories file at the end of the category definitions file,
once the formatting of all the categories has been defined. The inconvenient of this approach is that,
if a file defines an explicit formatting for some of the subcategories, as Chighlighting_iso.tex
does for PredefinedConstant, and later another category definitions file is input, say
Chighlighting_mine.tex, and this one does not apply any particular formatting to
PredefinedConstant, the definition from Chighlighting_iso.tex will remain,
and that was not the intent. If the syntax highlighting file that you include by default in your
Tcode_⟨Lang⟩.tex file does define an explicit format for some of the
subcategories you must use the first, simpler, approach for ⟨Lang⟩_subcategories.tex.
The macro \TcodeDefineFormat is almost the same as
\TcodeDefineFormat[py]{Scope}{\FormatpyKeyword}
The only difference is that it omits the update-kernel-format check.
If you'd like \let to be used, just use \TcodeCopyFormat or \TCopyFormat instead.
Redirection of categories
You may have some words that may belong to one or other category. This seldom happens. To bring up an actual example,
many math function in C, such as sqrt, log or sin, may stand for an actual function
or for a type-generic function (typically implemented as a macro). So you may define them in the words file as
\MakeWord{sqrt}{TGFunction}
\MakeWord{log}{TGFunction}
\MakeWord{sin}{TGFunction}
etc.
and at a later point, if you want them formatted and recognised as plain generic functions, write either of
\TcodeRedirect[C]{TGFunction}{Function} \TcodeRedirect{TGFunction}{Function}
As usual, the second form will take \TcodeLang as the language to which the redirection applies.
This will change all TGFunction's to Function's. The approach taken in the package for C is to
define them as
\MakeWord{sqrt}{FuncTGFunc}
\MakeWord{log}{FuncTGFunc}
\MakeWord{sin}{FuncTGFunc}
etc.
and in the categories file itself include \TcodeRedirect{FuncTGFunc}{TGFunction}.
A user may later write \TcodeRedirect{FuncTGFunc}{Function} if he prefers so. This way the change only
affects the ambiguous identifiers.
\TcodeRedirect uses \def, not \let. Thus, the above redirection will expand to
\def\FormatCFuncTGFunc{\FormatCTGFunc}
This is almost the same code that \TcodeDefineSubcategory{FuncTGFunc}{TGFunction} would generate,
which is
\protected\def\FormatCFuncTGFunc{\FormatCTGFunc}
The \protected here, that is also placed by the macros defining the categories, \TcodeDefineFormat, etc.,
is so that if the user writes \edef\Category{\FormatToApply}, typically in a PrePrintHook,
the final expansion is the category that the word belongs to. For example, after \TcodeRedirect{FuncTGFunc}{TGFunction},
an expansion of \edef\Category{\FormatToApply} will result, for the definition of \Category,
in {\FormatCTGFunction}, while after the code \TcodeDefineSubcategory{FuncTGFunc}{TGFunction},
the resulting definition for \Category in the above situation, will be {\FormatCFuncTGFunc}.
Summary of commands
In all cases below, the bracketed argument [#1lang] is optional.
| \KernelFormatDefaults | \lang@Format{#1name} |
| \TcodeDefineFormat[#1lang]{#2name}{#3code} |
\Format{#1name}
|
| \TcodeEdefFormat[#1lang]{#2name}{#3code} |
\@FormatToApply{#1name} |
| \TcodeCopyFormat[#1lang]{#2name}{#3name} |
| \TCopyFormat{#1name}{#2name} |
| \TcodeDefineSubcategory[#1lang]{#2name}{#3name} |
| \TcodeRedirect[#1lang]{#2name}{#3name} |
Colour
If you are using this package you will likely want colour in your document. Or at least gray, but gray is usually obtained also with
colour packages. Many examples in this manual indeed use \color in format definitions. A general \color
macro is probably too complex for your needs. Tcode is intended to be fast, and a document may have hundreds or even
thousands of format switches because of displayed code, each of them using \color. To make this faster, and because
most users want pdf output and are comfortable with RGB or gray level definitions of colours, Tcode comes with a package on its own
for optimizing those kinds of colour definitions and invocations. This is the package (file) pdfcolor-rg.tex. In all rigour,
this file has nothing to do with typesetting code. See The pdfcolor-rg package for
a description of the package.
Usage of pdfcolor-rg with Tcode
None of the files with format definitions that come with Tcode ever inputs pdfcolor-rg.tex.
The files Tcode_C.tex and Tcode_py.tex do input those files, but only if no definition for
\color is present at the point those files are input. Thus, if you are using another colour package,
the aforementioned Tcode_⟨Lang⟩.tex files will abide by them. If you are not using these files
and you want to take advantage of the fast macros from pdfcolor-rg.tex, you should input this file
before including the definitions of formats for the categories. If you are defining new colours, you have to use
the \DefColor or \DefGray commands from pdfcolor-rg.
The format definitions files that come with Tcode, which at the time of this writing are three for C, one
for py (python) and one for julia, detect if those macros are available and use them if so.
They all include at their beginning
\input highlighting_common.tex
that in turn inputs highlighting_color.tex. This latter file includes the tests
\ifdefined\DefColor and \ifx\color\PdfColor,
and use them if available.
As regards the definition of colours, the actual code of highlighting_color.tex is
\ifdefined\DefColor
\let\DefineColor\DefColor
\let\DefineGray\DefGray
\else\ifdefined\definecolor
\def\DefineColor#1#2{\definecolor{#1}{rgb}{#2}}
\def\DefineGray#1#2{\definecolor{#1}{gray}{#2}}
\else\unless\ifdefined\DefineColour
\ifdefined\AtBeginDocument
\def\DefineColor#1#2{\AtBeginDocument{\definecolor{#1}{rgb}{#2}}}
\def\DefineGray#1#2{\AtBeginDocument{\definecolor{#1}{gray}{#2}}}
\AtBeginDocument{\def\DefineColor#1#2{\definecolor#1}{rgb}{#2}}}
\AtBeginDocument{\def\DefineGray#1#2{\definecolor#1}{gray}{#2}}}
\else
⟨Error message⟩
\def\DefineColor#1#2{}
\let\DefineGray\DefineColor
\fi
\fi\fi\fi
Thus, the various ⟨Lang⟩highlighting files that come with Tcode use \DefineColor
and \DefineGray. If neither \DefColor/\DefGray nor \definecolor are
available at the point the category definitions file is input, there is little this latter file can do. If we are in Latex, it hopes that
a colour package with a standard definition of \definecolor will be input afterwards; otherwise, defining
\def\DefineColor#1#2{} and similarly for \DefineGray,
in the hope that a later package will define the colours, is unlikely to work because that later package need not only
define, say, redgray (itself quite unlikely), but also colours named function, for instance.
Then the format definitions include lines like
\TcodeEdefFormat{Function}{\ColFill{function}}
\TcodeEdefFormat{Comment}{\color{green}}
If the pdfcolor-rg package is available \ColFill will be \PdfFill, from that package;
otherwise it will default to \color. \PdfFill is slightly more efficient: while \color
sets both rg and RG in the generated pdf, \PdfFill only sets rg.
If this causes problems to you, just write \let\PdfFill\color after the inclusion of pdfcolor-rg.
The highlighting files that come with Tcode use \color twice: for
comments and strings; because these elements may include weird stuff (handcrafted characters or rules),
translated by ***TeX into RG.
high_color.tex takes care that the definition of \color
is suitable for use in an \edef, in particular for the \edef implied by \TcodeEdefFormat.
The usual definition of \color from a Latex package is not. If \color is undefined
at the point high_color.tex is input, the definitions for \color
and \ColFill will be
\let\color\relax
\protected\def\ColFill{\color}
so that these commands do not expand further in an \edef. When a colour
package is input later, \color will get some definition.
Note that the format definitions for C and py that come with Tcode (but not those
for julia) use Edef, not Define. This way, the command
\ColFill or \color will get expanded on the spot to further optimize the format macros,
if the definitions from pdfcolor-rg are being used. For example, if you input Tcode_C.tex and
write \show\FormatCFunction, you will get
\FormatCFunction=\protected macro:
->\PdfFillRaw {0.31 .22 0.08}.
Multilanguage support
Category definitions files for different languages can conflict in their definitions of colour. For instance,
\DefColor{function}{0, 1, 0} in one file may clash with
\DefColor{function}{{0.7, 0.3, 0.6} in another file.
Both files will likely include something like \TcodeDefineFormat{Function}{\color{function}}.
This means that words recognised as functions will be formatted in both languages with the colour
“function” that was defined in last place. This cannot be solved by the language switching
mechanism.
There are two easy solutions to this problem. The first one consists in not using \TcodeDefineFormat
for defining the formats but \TcodeEdefFormat, and use the package pdfcolor-rg. This
way the code \TcodeEdefFormat{Function}{\color{function}},
supposing the language is named R and taking the first definition of the two above for the function colour,
will make the format for Function be defined as if by
\def\FormatRFunction{\PdfColorRaw{0 1 0}}
With other colour packages it may be possible, but you need to know the internals
of the package.
The other solution is the obvious one: including, in the names of colours, your language as part of the name: Rfunction,
Rcomment, etc.
Fonts
Changing \SelectCodeFont
Just as for colour, an efficient handling of font switching is crucial to achieve the high speed
of parsing that the Tcode environments intend. In particular, Latex font switch mechanism
is notoriously slow. Therefore, for documents with hundreds of instances of the environments it is highly
recommended to sidestep any general font handling and write ad-hoc font selection for the typeset code.
Specifically, it is recommended to modify \TcodeHook or \SelectCodeFont.
Tcode's default for \TcodeHook is \SelectCodeFont, which itself is
either \tt or \ttfamily, depending on whether the last one is defined or not.
Because the font to be used for the code will be the same throughout the document, \TcodeHook
can be set up to select that font. In order to discover which font it is, you may type
\def\aaa{\showthe\font}
Some text \ncode{\aaa} % or just {\tt\aaa}
Let us suppose that the result is \T1/lmtt/m/n/10. Then you just define
\catcode`/=11
\def\SelectCodeFont{\T1/lmtt/m/n/10}
\catcode`/=12
You need to make sure that Latex builds up the command \T1/lmtt/m/n/10 and associates it
with a font before the first time you use it. To this end, it is enough that you write
\AtBeginDocument{{\ttfamily}}.
If you want to make the font size configurable, you would write instead
\def\SelectCodeFont{\csname T1/lmtt/m/n/\f@size \endcsname}
because it is in \f@size that Latex keeps the font size. Then you would need
to extend the \AtBeginDocument above to make Latex select the \ttfamily font at each of the sizes
you plan to typeset the code. E.g.,
\AtBeginDocument{{\ttfamily\large\small\footnotesize\scriptsize}}
Changing \SelectCodeFont instead of \TcodeHook has the advantage that you
do not trample on other commands that \TocodeHook may include.
If you are writing a package and want this change in \SelectCodeFont to take place, but
do not want to require the user to know about this, you may insert \AtBeginDocument the following code
{\ttfamily\escapechar=-1 \edef\thettfont{\exP\string\the\font}
\def\next#1/#2/#3/#4/#5\relax{\toks0={\csname#1/#2/#3/#4/\f@size\endcsname}}
\exP\next\thettfont\relax %Strip out the size
\xdef\SelectCodeFont{\the\toks0}
}
If you add a
\show\SelectCodeFont for testing, you will see that its expansion is
exactly as suggested above.
Tcode comes with a file Tutils-fastfonts-1.tex, that does this. It is included in Tcode_C.tex
and Tcode_py.tex. See Font selection.
Using more than one font
You may want to use more than one font for the typeset code: regular and bold, regular and italics, etc.
You can still change \SelectCodeFont to select the regular variant and then the format definitions for
each category must include the font change when needed; e.g.,
\TcodeDefineFormat{Keyword}{\Cbold\color{blue}}
And the category definitions file must define \Cbold. E.g., as \bf or
\bfseries.
This way a later layer can redefine \Cbold to select a fixed font, in the same way that the
\SelectCodeFont from \TcodeHook can be changed to select a fixed font. Tcode provides
a file Tutils-fastfonts-2.tex, that achieves this. See Font selection.
Chighlighting_iso.tex takes a slightly different approach. Even formats that use the
regular font carry a font selection command:
\TcodeEdefFormat{Number}{\Clight\ignorespaces}
\TcodeEdefFormat{String}{\Clight\color{string}}
The default definition of \Clight is not to do anything: \relax:
\unless\ifdefined\Clight \let\Clight=\relax\fi %Change nothing
\ifdefinef\bfseries
\unless\ifdefined\Cbold \protected\def\Cbold{\bfseries}\fi
...
This allows a later layer to shift the selection of the regular
font from \ShortNcodeHook to \Clight, and set \ShortNcodeHook empty,
because thus each formatting command carries enough
information to select the exact font. With this shift it avoids a double font selection in identifiers that use some other
variant, not the regular one, as in \ident{int} (keywords use the bold variant in this highlighting),
where the normal approach would have first \ShortNcodeHook select the regular fixed-width
font, through \SelectCodeFont, then \FormatC@int would select
\Cbold. In this highlighting, most identifiers use \Cbold, so this approach
saves some font switches.
This approach causes a double selection for the environments that still select the regular variant
in its hook: the long inline ones and Code. But a command that instructs TeX to select
the current font is inocuous. Further, the layer redefining \ShortNcodeHook can
also make \Clight back equal to \relax for those environments.
A further optimization
Suppose you are using more than one font in the typeset code and the size is not fixed. Then
you may have format definitions that include \Cbold, say, and the definition for
\Cbold may be \csname T1/lmtt/b/n/\f@size \endcsname;
though you, the package writer, may not know the exact font that goes into the \csname at the point
you are writing the hooks on entry.
If several instances of \Cbold are expanded within a single Tcode environment,
the \csname will be resolved on each time. You typically don't change size in the middle of
a code snippet, so for the display environment Code it may be worth to include in its hook; i.e.,
in \CodeHook,
\exp\edef\exp\Cbold\exp{\Cbold} \exP\let\exP\Cbold\Cbold
or a single assignment combining the effect of the two. (\edef\Cbold{\Cbold}
in place of the first one will not work if \Cbold is \protected, as can be expected). This code, when expanded,
will result in \let\Cbold\T1/lmtt/b/n/10, say, which is the fastest that \Cbold can be made.
This code must come after the font setup for the environment has taken place. One way to achieve this is
\CodeHook\exp{\CodeHook
\exp\edef\exp\Cbold\exp{\Cbold} \exP\let\exP\Cbold\Cbold
}
For the inline environments it may not be worth this complication and even counter-productive, because
they tend to have few if any font change, once the default font is set.
Fixing fixed-width fonts
Fixed-width fonts feature wider-than-normal spaces in many places in the code snippets. This can become
quite frustrating. One solution to fix this is to include \frenchspacing in \TcodeHook.
If possible, it is better to change the font parameters so that those extra spaces do not exist. Here is how
this can be achieved, where the command associated to the font is supposed to be named \codefont@x:
\fontdimen3 \codefont@x= 0pt
\fontdimen4 \codefont@x= 0pt
\fontdimen7 \codefont@x= 0pt
If you are using Latex's default names, the name of your command (the one to be placed in place
of \codefont@x) may be \TI/lmtt/m/n/10, for example. You may need a \csname;
note that you cannot make numbers of category 11 because then the numbers needed above
(3, 4, 7 and 0) will not be recognised.
Another issue that may upset you, but that arises much less often, are ligatures. If you want to
deactivate the ligatures here is how to do it:
\ifdefined\ignoreligaturesinfont % In Luatex
\ignoreligaturesinfont \codefont@x
\else % In pdfTeX
\pdfnoligatures \codefont@x
\fi
The file fswitch_bera09.tex that comes with Tcode includes examples
of both kinds of fixes. This file is intended as a template, apart from being usable by itself.